
Setup guide

TLP 350CV Cable Cubby • Setup Guide
4
TLP 350CV Setup Guide, Continued
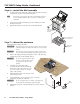
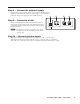
Step 6 — Install the AAP assembly
1. From the underside of the Cable Cubby, gently push the AAP shelf
assembly into position at the desired elevation.
T
Ensure there is enough space above the AAP assembly for the lid
to close completely without cables or connectors contacting the
touchpanel.
2. Secure the AAP shelf assembly into position with the provided
Phillips head screws.
3. Tighten the nuts that secure the AAPs to the shelf brackets.
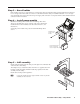
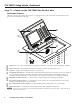
Step 7 — Mount the enclosure
Mount the Cable Cubby in the table.
W
The flanged edges of the trim ring are sharp. Exercise caution
when the cubby is not installed in a table to prevent personal
injury.
C
The trim ring edges are soft and can easily be nicked or bent.
Exercise caution when handling and mounting the enclosure.
1. Remove the edge grommet protecting the corners of the trim ring
and the plastic film on the finished surfaces.
C
Do not use isopropyl alcohol or other
solvents to clean the Cable Cubby.
Strong solvents will ruin some
finishes.
2. Carefully lower the Cable Cubby
enclosure into the cut out to test the fit.
If necessary, remove the enclosure and
use a file or rasp to enlarge or smooth
edges of the opening.
3. Install the table clamps onto the pins on the
side of the enclosure.
4. Snugly tighten the screws on the clamps to secure the
enclosure to the bottom of the table.
C
Do not overtighten the screw clamps. Overtightening
can bend the horizontal flange of the table clamp.
5. Tighten the wing nuts on the table clamps to lock the clamp in
position.
Table
Clamp
Both Sides
PC
LAPTOP
DVD
DOC CAM
AUXILIARY
DISPLAY ON
DISPLAY OFF
AUTO IMAGE
VOLUME
VOLUME
Extron
COMPUTER
AUDIO
Philips Head Screws
(secures AAP Shelf
Assembly)
Tighten down
AAP Nuts
Push assembly through
bottom of enclosure.
2
1
3