
Setup Guide


SMX System MultiMatrix Switcher • Installation 3
Installation
This section provides procedures for setting up the SMX and wiring
audio connectors. Topics in the section include:
• Rear Panel
• Wiring Audio Connectors
Rear Panel
RESET
RS232/RS422
REMOTE
LAN
ACT
LINK
2.0A MAX.
100-240V , 50-60Hz
US
LISTED
IT23
I.T.E.
®
PLANE ADRESS
S-VIDEO IN
S-VIDEO OUT
S-VIDEO
Y
Y
C
C
14
3
2
14
3
2
14
3
2
PLANE ADRESS
DIGITAL VIDEO
SDI / HDSDI OUTPUTS
SDI / HDSDI INPUTS
8
7
14
5
6
3
2
8
7
14
5
6
3
2
8
7
14
5
6
3
2
PLANE ADRESS
INPUTS
1
2
3
4
OUTPUTS
1
2
3
4
PLANE ADRESS
COMPUTER IN
5
6
7
8
1
2
3
4
5
6
7
8
1
2
3
4
COMPUTER OUT
S-VIDEO IN
S-VIDEO OUT
PLANE ADRESS
8
7
14
5
6
3
2
8
7
14
5
6
3
2
PLANE ADRESS
8
7
14
5
6
3
2
8
7
14
5
6
3
2
8
7
14
5
6
3
2
VIDEO OUTPUTS
VIDEO INPUTS
WB VIDEO
2
7
8
9
10
11
1
4
5
3
PLANE ADRESS
L 1 R
L 2 R
L 3 R
L 4 R
L 5 R
L 6 R
L 7 R
L 8 R
L 1 R
L 2 R
L 3 R
L 4 R
L 5 R
L 6 R
L 7 R
L 8 R
12
PLANE ADRESS
OUT
IN
1
OUT
IN
2
OUT
IN
3
OUT
IN
4
FIBER OPTIC
OUT
IN
1
OUT
IN
2
OUT
IN
3
OUT
IN
4
FIBER OPTIC
OUT
IN
1
OUT
IN
2
OUT
IN
3
OUT
IN
4
FIBER OPTIC
6
13
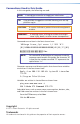
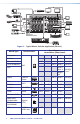
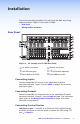
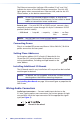
Figure 2. An Example of a 5U SMX Rear Panel
a
AC power connector
d
Remote serial port
b
LAN Ethernet port
e
-
l
I/O boards (optional)
c
Reset button and LED
m
Plane address switch
Connecting Inputs
Connect compatible AV sources to the applicable I/O board
connectors marked "Inputs" (see the table on page 2 for connector
and signal types).
Connecting Outputs
Connect compatible AV output devices to the applicable I/O board
connectors marked "Outputs" (see the table on page 2 for connector/
signal types or see Wiring Audio Connectors on page 4 for audio
connector wiring details).
Connecting Control Devices
LAN Ethernet port — Connect to an Ethernet LAN or WAN through
the RJ-45 connector on the rear panel to control the SMX using a PC
(see
b
in gure 2).