
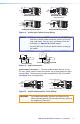
Setup Guide
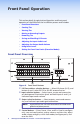


14 SMX System MultiMatrix Switcher • Front Panel Operation
Adjusting the Output Audio Volume
The audio output level of each output can be displayed and adjusted
through a range of 64 steps (1 dB per step, 0% to 100%). The audio
level can be adjusted from the front panel, RS-232, RS-422, or through
Ethernet. Adjustment is attenuation only.
NOTES: • Refer to the SMX User Guide for other adjustment
methods.
• Front panel adjustment and viewing are only available
when the unit is in Lock mode 0.
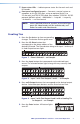
1. Press the Esc button to clear any pending changes. The button
flashes green once.
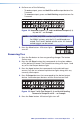
2. Press the desired audio I/O Plane button to be adjusted. The plane
button and Input 1 light.
I/O PLANE SELECT
1
2
3
4
5
6 7 8
9
10
11 12 13 14 15
0
Figure 20. Plane 4 Selected — an Example
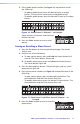
3. Press and hold any Ouput button until the I/O Plane button
flashes. I/O buttons turn off.
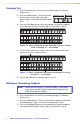
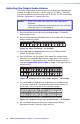
4. Press the button for the output that needs the audio volume
adjusted. The selected output button lights green. The current
audio volume is indicated by the lit and flashing Input buttons
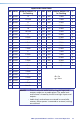
(see the Output Audio Volume Table on page 15 for lighting and
volume levels).
INPUTS
1
2
3
4
5
6 7 8
9
10
11 12
13 14 15 16
OUTPUTS
1
2
3
4
5
6 7 8
9
10
11 12 13 14 15 16
Figure 21. Output 3 Set to 100% Audio Volume — an Example
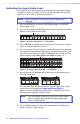
5. Press and hold the View button to decrease or the Esc button
to increase audio level. The selected output button remains lit.
Inputs light, flash, or go out as the volume changes.
INPUTS
1
2
3
4
5
6 7 8
9
10
11 12
13 14 15 16
OUTPUTS
1
2
3
4
5
6 7 8
9
10
11 12 13 14 15 16
Figure 22. Output 3 Set to 67.0% Audio Volume — an Example
6. Press the Enter button to leave the output audio volume
adjustment mode. All button lights turn off.