
Installation guide


Stage 5:
Testing the System
This stage consists of conguring, setting up, and testing the VoiceLift System.
1. Set up the microphones.
Set up each microphone in your VoiceLift
system as follows:
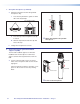
a. Set the channels using the rotary switch. A
and C are at 2.3 MHz, and B and D are at
2.8 MHz.
NOTES:
• Each microphone must be set to a
different frequency; in other words,
only channels A and B, A and D,
B and C, or C and D can be used
together (on the VLH 102 Handheld
Microphone you can select only
channels A and B).
• If the student is using a pendant
microphone, it is recommended
that you disable the volume buttons
by setting the channel to C or D.
This prevents the student from
inadvertently pressing both volume
buttons simultaneously and sending
an instant alert (see Installation
Example — Setting Up an Instant
Alert on page 37).
b. (Pendant microphone only) Apply a Teacher,
Student, Mic 1, or Mic 2 label to the back of
the microphone.
c. Remove the battery cover and insert the
battery.
d. Replace the battery cover.
Ä
–
û
Set up the microphone.
1b
A
B
VOLUME
VLH 102 Handheld Microphone
A
B
1a
VLP 202 Pendant Microphone
A
B
C
D
1a
1c
1c
33VoiceLift System with PVS 405D Installation Guide • Installation — Stage 5