
Manual
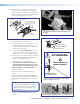

ix. Check for stress on the arms. To do this
loosen the mounting screws (do not remove).
If the arm or the barrel lifts, this indicates
stress on the arm. Adjust the height of the
threaded barrels to reduce or eliminate
any torque or stress that might be caused
by crossed arms or by projector mounting
points with differing heights. It is important to
keep the arms level and as close (low) to the
projector base as possible.
x. Check that the projector weight is still as
evenly distributed as possible.
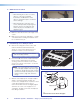
Hand tighten the screws until snug.
ATTENTION: Do not overtighten the
mounting screws as this may damage the
projector. See the projector manual for the
threaded insert torque setting.
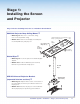
f. Lift the projector up to the adjuster plate and
slide it into place. Tighten down the locking and
pivot screws.
3. — Verify the Image Location
a. Connect a power cable to the projector and
turn it on.
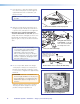
b. Verify image size and location by loosening the
PCM 340 pipe adapter plate wing nuts, and
adjust the plate (left-right) to center the image.
TIP: Remember to include the vertical and
horizontal offsets when aligning the projector.
See the projector manual for information
c. When satisfied, tighten down the plate wing
nuts.
ß
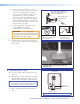
Slide and lock the projector onto the
adjuster plate.
Projector
Center Line
Lens
Center Line
Measure the
horizontal offset
⊗
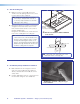
INCORRECT CORRECT
Arm not level, causing stress Arm level, no stress
on mounting point on mounting point
Loosen the screw and adjust
the barrel height to reduce torque
on the arms and bracket.
Tighten down all the
mounting screws.
Washer
TIP: Horizontal offset
PoleVault IP Systems • Installation — Stage 1 (Screen and Projector) 15