
Manual
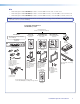
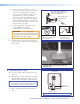

Using the slot closest
to the barrel, secure the
arms to the bracket with
the clamp and screw.
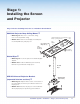
vi. Pivot the arms so that they extend towards
the center of the projector (see the figure at
right). Adjust the arms as needed for your
projector model.
NOTE: Avoid overlapping the arms where
possible.
vii. With the security flange towards the rear of
the projector, place the projector bracket on
top of the arms and adjust for slot alignment.
• Using the slots on the bracket that are
closest to the barrel on each arm, place the
clamp under the arm and lightly secure it to the
bracket with the adjustment screws (see the
figure at right). Loosely secure all the mounted
arms.
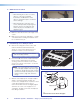
NOTE: Where arms are unavoidably
crossed, replace the original adjustment
screw with a supplied 10-32 ¾ inch
adjustment screw and secure both
arms to the bracket using one clamp. In
addition, the barrels on the arms must be
raised to compensate, keeping the arms
level and reducing stress.
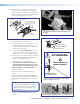
viii. As close as possible, balance the weight
of the projector evenly across the projector
bracket. Lift the bracket at opposite corners
to assess if the configuration is approximately
balanced.
ATTENTION: Take into consideration the
uneven weight distribution of the projector
when lengthening or shortening the arms.
Distribute the projector weight evenly on
the arms.
Adjust the bracket on the arms as needed.
The projector shown at right is as close as
possible to being evenly balanced.
Washer
Arms
Clamp
Bracket
Where arms cross, use the
supplied screw to secure
both arms to the bracket.
See note at left.
vi. Pivot arms towards center of projector.
vii. Secure arms with clamp
Note: If arms cross, secure both with clamp
viii. Evenly balanced conguration
PoleVault IP Systems • Installation — Stage 1 (Screen and Projector)14