
Manual
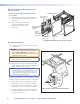


D10. Verify and Configure the Setup.
Turn on the power to all the devices. Verify and
configure the system.
See the PVS 405D User Guide, or PVS 305SA IP
User Guide available at www.extron.com for full
details.
D11. Attach the Door Tether to the Door.
The PVM 220 enclosure has a coiled door tether
installed on the right side of the enclosure (when
viewed from the front).
After the device mounting plate is installed, the
tether should be attached to the door to ensure
safety when the door is opened.
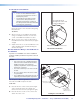
To attach the tether to the door:
a. With the door fully open, locate the
door tether attached within the
enclosure. The coiled tether has a looped end
to be attached to the door.
b. In the lower corners of the door locate the
cutout with a “T” shaped metal tab (see figure
at right).
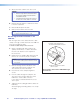
c. Stretch the tether and close up the door until
the loop on the tether can be carefully slid over
the “T” tab on the door. Ensure the loop is
completely over the “T”.
d. Carefully lower the door to the full extent of the
tether to ensure it functions correctly.
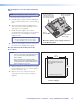
D12. Secure the Door Latches.
Both door latches can be made secure so the door
cannot be opened accidentally or inadvertently.
To secure the latches close the door and tighten
down the small set screws onto the latch (see the
figure at right).
For full safety secure both latches.
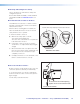
To secure the latch from opening
tighten the set screw onto the latch.
Push the tether loop completely over the T tab on the door.
Attach the door tether.
Secure the door latch.
PoleVault Digital Systems • Installation — Stage 4 (PVM 220 and PVS 405D) 59