
Manual


à
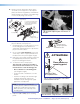
Mark the structural ceiling for lag eye
bolt installation.
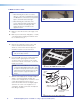
4. Cut the Ceiling Tile.
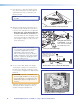
a. Mark the location of the PCM 340 on the
T-frame. This aids putting it back in the correct
location when the tile is replaced.
TIP: Mark the screen direction on back
of the tile (for example with an arrow or
“to front”) to help orientation of tile when
replacing it after cutting
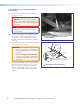
b. Measure the distances X and Y (see the figure
at right) from the inner vertical section of the
front and left T-frame runners to the center of
the Pipe Adapter Plate.
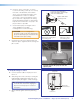
Using the X and Y dimensions, mark and cut a
hole for the slotted pipe in the ceiling tile.
TIP: Place the tile on a box and mark the
center of the hole on the underside of the
tile. Use a hole saw bit to start to cut the
hole by hand (turning bit counter clock-
wise) to avoid damaging the tile. When the
drill bit is through the tile, turn the tile over
and finish cutting from the top side
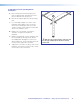
5. Preliminary Safety Hardware Installation
a. Mark and drill holes at 10 degrees out from
vertical for each turnbuckle. Drill a fifth hole
directly centered above the PCM 340 for the
safety cable.
b. Install an appropriate anchor or lag eye bolt for
the structural ceiling into each drilled hole.
Underside of Tile
Top Side of Tile
T-bar
X"
Y"
Minimum and
Maximum
Throw Distance Marks
á
Take the measurements with the PCM 340
on the T-frame.
TIP: Mark and start cutting the hole on the
underside. Finish on the top side.
PoleVault Digital Systems • Installation — Stage 1 (Screen and Projector)22