
Manual
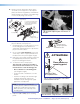


1. Mark Screen Location.
TIPS:
• When marking the location of screens,
devices, or the site for installing transmitters
and MediaLink control devices, use painters
tape to avoid wall surface damage.
• When marking the center line of the
screen, where possible, keep it aligned
with the center of the ceiling tile. This
makes the projector installation and
alignment easier.
a. Mark the center line and the outer edges of the
screen.
b. Mark any structural studs, utility pipes, conduits,
or fire breaks before drilling the hardware holes.
Do not drill the holes yet.
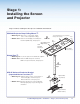
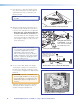
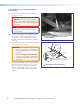
2. Install Projector to Verify Location.
a. Remove the ceiling tiles at the location, and
mark the maximum and minimum throw
distances on the T-frame. See the projector
installation manual for more information.
TIP: For ease of working on the T-frame,
remove the adjacent tiles.
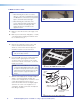
b. Place the PCM 340 over the T-frame, between
the two marks. Lightly tighten the T-frame
securing screws. The T-frame screws can be
used on the outside or the inside to secure the
PCM to the T-frame.
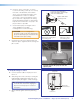
NOTE: Place the PCM 340 on the T-frame
so that the pipe adapter slides left to right
in relation to the proposed screen location,
rather than towards and away from it. This
makes it easier to align and center the
image.
c. Slide the slotted pipe up into the pipe adapter.
Adjust to the desired height and align the
location holes and pipe holes. Insert the location
screw, lightly tightening it down using a
5/32 inch hex wrench. Insert and lightly tighten
down the set screws onto the pipe. Do not
overtighten. The pipe is removed and replaced
later during installation.
PCM 340
Minimum/Maximum
Throw Distance Marks
É
Place the PCM 340 on the T-bar
Ä
Mark the screen location.
î
Insert and secure the slotted pipe.
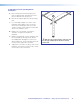
Align Pipe holes with
location screw holes.
Insert location screw
and secure.
Pipe
Adapter
Slotted
Pipe
PoleVault Digital Systems • Installation — Stage 1 (Screen and Projector)18