
Manual


PCM 340 Projector Drop Ceiling Mount
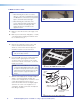
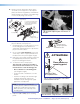
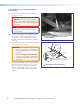
a
• Where it goes: Attaches to a structural ceiling,
rests on the suspended ceiling.
• What it does: Holds the slotted pipe, PoleVault pole
mount kit (PMK 560), and projector.
Slotted Pipe
b
• Where it goes: Locks into place in the PCM 340 adapter.
• What it does: Holds the PMK 560 pole mount kit,
UPB 25 Projector Bracket, and projector.
UPB 25 Universal Projector Bracket
(separated into two sections) c
• Where it goes: Adjuster Plate screws onto the base of
the slotted pipe, and the Projector
Bracket attaches to the projector.
• What it does: Attaches the projector to the PCM 340.
Allows proper projector positioning and
orientation.
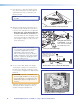
T
-bar
Secur
ing
Scre
ws (4)
Slotted
Pipe
Adjuster Plate
(Top Section)
PCM 340
UPB 25
Projector Bracket
(Bottom Section)
Pipe Adapter Plate
Wing Nuts (4)
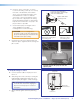
3
2
1
1-gang and 2-gang Accessory Mounting
Points (Power Sockets)
Pipe
Adapter
Base
Plate
Pipe Adapter
Set Screws (2)
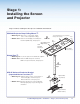
Stage 1:
Installing the Screen
and Projector
Stage 1 Involves installing the three pieces of hardware shown below.
PoleVault Digital Systems • Installation — Stage 1 (Screen and Projector)
17