
Setup Guide User Manual

Setup Guide — P/2 DA8 and DA12 Series
(Continued on reverse side)
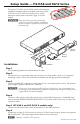
Installation
Step 1
Turn all the equipment off and disconnect all cables.
Step 2
Place the unit on a convenient table top or mount it in a rack, under a desk, or on a projector
mounting system. Follow the instructions included with the appropriate mounting kit.
Step 3
Use the provided IEC connector to connect the unit to a convenient power socket. The internal
power supply supports 100-240 VAC, 50-60 Hz.
C
Always use a power supply specified by Extron for this unit. Use of an unauthorized
power supply voids all regulatory compliance certification and may cause damage to the
supply and the distribution amplifier.
Step 4
Connect a video source to the video input, using a female DB-15 connector. Acceptable input
formats include: RGBHV, RGBS, RGsB, RsGsBs, YUV (tri-level and bi-level sync), S-video, and
composite video.
Step 5 (P/2 DA8 A and P/2 DA12 A models only)
Connect an unbalance audio source to the female 3.5 mm TRS connector.
Step 6
Connect up to eight (P/2 DA8 series) or twelve (P/2 DA12 series) display devices using female
DB-15 connectors. The output signal format follows that of the input.
N
Output 1 is used for DDC reference.
The Extron
®
P/2 DA8 and P/2 DA12 series of distribution
amplifiers distribute video (all models) and stereo audio
(P/2 DA8 A and P/2 DA12 A models only). Unless
otherwise stated, these instructions apply to all four
models.
W
These instructions provide a quick setup
guide for experienced installers. Installation
and service must be performed by authorized
personnel only.
100-240V
0.6
A
50-60Hz
INPUTS
VIDEO OU
TPUTS
P/2 D
A8 A
2 4
6 8
1 3 5
7
AUDIO OUTPUT
S
MUTE
L
R
7
L
R
8
L
R
5
L
R
6
L
R
3
L
R
4
L
R
1
L
R
2
1 3 5 7
2 4 6 8
A
PC
Local Monitor
Audio In
Video In
Projector
Plasma
Display
Sound
System