
User guide


MTP U R Series • Installation
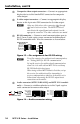
Furniture or projector mounting
Use the optional mounting kit (MBU 123, furniture,
part #70-212-01, or PMK 100, projector, part #70-217-01) to
mount the MTP as follows:
MTP SERIES
INPUT
OUTPUT
POWER
12V
.5A MAX
MTP R 1 5HD A
ON
1 2 3 4 5 6
H SYNC +
V SYNC +
C SYNC
SOG
VIDEO
SPARE
1
MONO AUDIO
2
Projector
Pole
Mount
Kit
Mounting
Bolt
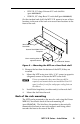
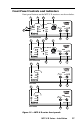
Figure 11 — Desk and projector mounting the MTPs
1. Remove the feet from the bottom of the MTP, if they are
installed.
2. Attach the mounting brackets to the MTP with the machine
screws provided.
For furniture mounting
3a
. Hold the MTP with the attached brackets against the
mounting surface. Mark the bracket screw hole locations
on the mounting surface.
3b. Drill 3/32" (2 mm) diameter pilot holes, 1/4" (6.3 mm)
deep in the mounting surface at the marked screw
locations.
3c.
Insert #8 wood screws into the four pilot holes. Tighten
each screw into the mounting surface until just less than
1/4
"
(6 mm) of the screw head protrudes.
3d. Align the mounting screws with the slots in the brackets
and place the MTP against the surface, with the screws
through the bracket slots.
3e. Slide the MTP slightly forward or back, then tighten all four
screws to secure the MTP in place.
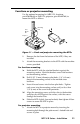
For projector mounting
3
. Attach the MTP to a projector mount by inserting the
mounting bolt through the pole mount’s slotted hole and
secure. in place
11