
User guide


ES9600 User Guide Chapter 5: Linear Timecode
55 Version 1.13
The <cr> character indicates that a carriage return, ascii character 0D (hex) is required.
Reference
For more information on setting up communications protocols refer to:
Chapter 8: Remote Control Protocols.
Appendix A: TCP/IP Communications.
Configuring as a Timecode Master
In the master mode the ES9600 is programmed to generate timecode when a video clip begins playing. This
allows any slave devices to be locked to the video output from the Player. Each clip can have its own unique
timecode and has the ability to generate a ‘pre-roll’ and/or ‘run-on’ option.
Note: A Clip has to be cued using the transport controls or a remote control message for the timecode settings to
be activated.
Start Time
This is the timecode that will be generated when a play command is received after the clip is cued. If the Play At
(see below) option is not enabled, this will also be the point when video output begins. The Player will output this
timecode, as a “Jam Sync” signal, when a cue command is issued.
Play At
Select the Play At box and enter a time for clip playback to begin. The difference between the ‘Start Time’ and
‘Play At’ time is known as “pre-roll”, i.e. a period where timecode is generated before the video starts. This might
be used for pre show setup before the video begins.
Stop At
Select the Stop At option to set a stop point for the timecode. This time can be before or after the end of the video
output. This might be used for controlling “post show” equipment such as fading house lights up. The Stop At
time is independent of the length of the video clip. Stop At can be used to halt the timecode while the clip is still
playing, or extend the timecode after the clip has ended.
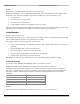
The following examples show some typical uses of the timecode generation options:
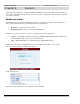
Generate a timecode starting at 01:00:00:00 when the play command is received.