
Installation User guide


Software-based Confi guration and Control, cont’d
MLC 226 IP Series • Software-based Confi guration and Control
4-6
PRELIMINARY
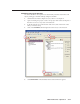
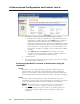
5. Set the MLC for the new IP address using either step 5a or step 5b.
a. Enter the new IP address for the MLC, the corresponding subnet mask,
and the gateway address, then click on the Submit button. IP addresses,
subnet mask, and e-mail addresses follow standard naming and
numbering conventions/protocol. The IP network administrator should
provide the IP addresses and subnet mask to be used with this controller.
It takes a minute or so for the controller to store the new settings. Once
the controller’s IP address is changed, you lose communication with the
controller.
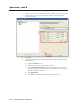
b. Select DHCP On, then click Submit. It takes a minute or so for the
controller to store the new settings. Once the controller’s IP address is
changed, you lose communication with the controller.
6. Close the browser.
7. After changing the controller’s IP settings, change your PC’s TCP/IP settings
back to their original confi guration.
Confi guring the MLC for network communication using SIS
commands
RS-232
The MLC can also be confi gured using serial (RS-232) communication and a
terminal emulation program such as HyperTerminal, which is installed with
Windows. For information on RS-232 port requirements (including 38400 baud)
and on Simple Instruction Set (SIS) commands, variables, and syntax, see chapter 5.
Telnet
The MLC and the PC must both be part of the same subnet before they can
communicate via the LAN port. You must change the PC’s IP address to one that is
on the same subnet as the default IP address of the MLC (192.168.254.254).
N
This method requires connecting the MLC to the PC’s LAN port using a
crossover network cable. See pages 2-13 and 2-14 for cabling details.
1. Temporarily change the host PC’s IP address. See “Setting up the PC for
IP communication with an MLC” later in this chapter for step-by-step
instructions.