
Installation User guide


3-9
MLC 226 IP Series • Operation
PRELIMINARY
Using the front panel
One or more PINs must be confi gured before this procedure can be used. See
“Preparing the MLC for front panel lockout“ later in this chapter.
N
Make sure the projector is off before using a PIN to lock the front panel.
DISPLAY
ON
OFF
VOLUME
VOLUME
DISPLAY
ON
OFF
VOLUME
DISPLAY
ON
OFF
DISPLAY
ON
OFF
VOLUME
VOLUME
DISPLAY
ON
OFF
DISPLAY
ON
OFF
VOLUME
1
2
3
4
5
6
LAPTOP
VCR
DVD
PC
AUX
VIDEO
LECTERN
PC
1
2
3
4
5
6
LAPTOP
VCR
DVD
PC
AUX
VIDEO
LECTERN
PC
MUTE
AUTO
IMAGE
1
2
3
4
5
6
LAPTOP
VCR
DVD
PC
AUX
VIDEO
LECTERN
PC
AUTO
IMAGE
1
2
3
4
5
6
LAPTOP
VCR
DVD
PC
AUX
VIDEO
LECTERN
PC
AUTO
IMAGE
1
2
3
4
5
6
LAPTOP
VCR
DVD
PC
AUX
VIDEO
LECTERN
PC
AUTO
IMAGE
LIGHT
ON
LIGHT
OFF
AUTO
IMAGE
1
2
3
4
5
6
LAPTOP
VCR
DVD
PC
AUX
VIDEO
LECTERN
PC
LIGHT
ON
LIGHT
OFF
AUTO
IMAGE
MUTE
MUTE
MUTE
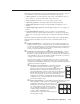
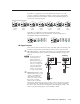
Press and hold both
Projector On/Off buttons
simultaneously.
The Projector On/Off
buttons light green, the
other buttons dim, and the
bottom Volume LED blinks.
While still pressing the
Projector buttons, enter the
PIN. Use the input selection
buttons as a 6-key numeric
keypad; press one button at
a time.
One green Volume LED
lights at a time as the buttons
are pressed.
Release
all
buttons.
If the correct PIN is entered, the green Volume LEDs flash and all
buttons flash red 3 times, indicating that front panel is locked, then
return to the way the
y were lit before front panel lockout was set.
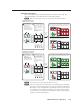
Locking the Front Panel of an
MLC 226 IP Series Controller
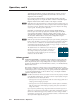
Unocking the Front Panel of an
MLC 226 IP Series Controller
1
1 2
If an incorrect PIN is entered, no buttons flash, the green Volume
LEDs turn off, and the red (top) LED blinks. Then the buttons light
as they were lit before front panel lockout was set.
Release
all
buttons.
If the correct PIN is entered, the green Volume LEDs flash and all
buttons flash green 3 times, indicating that front panel is locked, then
return to the way they were lit before front panel lockout was set.
If an incorrect PIN is entered, no buttons flash, the green Volume
LEDs turn off, and the red (top) LED blinks. Then the buttons light
as they were lit before front panel lockout was set.
This example shows the
default administrator PIN:
1 2a , 3 2b , 4 2c , 6 2d .
This example shows the
default administrator PIN:
1 2a , 3 2b , 4 2c , 6 2d .
2a 2b
2c 2d
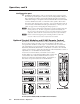
Press and hold both
Projector On/Off buttons
simultaneously.
The Projector On/Off
buttons light green, the
other buttons dim, and the
bottom Volume LED blinks.
While still pressing the
Projector buttons, enter the
PIN. Use the input selection
buttons as a 6-key numeric
keypad; press one button at
a time.
One green Volume LED
lights at a time as the buttons
are pressed.
1
1 2
2a 2b
2c 2d
N
The PIN can be entered via either the MLC or the SCP.
N
Failure to confi gure the On or Off buttons to send display/projector commands
upon button release (instead of button press) may cause problems with the PIN
Mode feature. (If one On/Off button is pressed before the other, and the buttons
are confi gured to send commands at the button press, the fi rst button’s actions
can be executed, preventing you from locking the front panel until the display’s
warmup or cooldown period fi nishes.)