
Installation User guide


MLC 226 IP Series • Installation
2-2
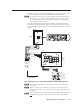
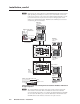
Installation
PRELIMINARY
TEXT
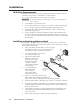
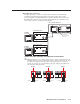
Separate the two-
piece button here at
the corner.
Pry the two
pieces apart.
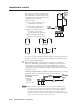
Diffuser
Plunger
Base
Button Label
Clear Lens
Notch
UL/Safety Requirements
The Underwriters Laboratories (UL) requirements listed below pertain to the safe
installation and operation of a MediaLink
™
Controller (MLC).
1. Do not use the MLC near water or expose it to liquids.
W
To reduce the risk of fi re or electric shock, do not expose this apparatus to
rain or moisture.
2. Clean the MLC only with a dry cloth.
3. Do not install the MLC near any heat source, such as a radiator, heat register,
stove, or another apparatus (including amplifi ers) that produces heat.
4. Unplug the MLC during lightning and thunder storms or when it will be
unused for long periods.
5. For the installation to meet UL requirements and to comply with National
Electrical Code (NEC), the MLC must be installed in a UL approved junction
box. The end user or installer must furnish the junction box; it is not included
with the MLC.
Installing or Replacing Button Labels
For the MLC or the optional SCP control panel, you may wish to customize the
button labels. The labels can be changed at any time. Follow these steps to change
the translucent button labels:
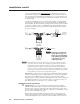
1. Remove the button from the MLC or SCP; use a small,
fl at bladed screwdriver such as an Extron Tweeker
to gently pry a button out from the front panel.
2. Locate the notch in the corner of one
side of the clear button cap.
3. Separate the white backing
(diffuser) from the clear
button cap (lens); insert
the blade of the small
screwdriver into the
corner notch and gently
twist the blade.
4. Save the translucent,
white diffuser, but
remove the text/
label insert from the
transparent button cap.
5. Select one of the button labels from the
printed label sheets included with the device
(MLC or SCP). Remove the label from its backing, if applicable.
6. Insert the button label into the button cap. Check for correct label orientation.
7. Align the white diffuser plate with the cap. The bumps on the diffuser plate
should be aligned (top and bottom) with the notches on the clear button cap.
Firmly snap it into place.
8. Align the tabs on the MLC’s plunger with the notches on the diffuser plate.
Gently but fi rmly press the reassembled button into place in the MLC’s or
SCP’s front panel.
9. Repeat steps 1 through 8 as needed to relabel other buttons.