
User Manual


JMP 9600 Hardware Profile
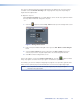
The options listed on the JMP 9600 Hardware Profile submenu of the Options menu
tailor the output of the encoder for particular use on the JMP 9600 player. Select a profile to
define which encoding parameters are best suited to the required DCP. See the
JMP 9600 User Guide for more information about the JMP 9600.
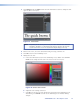
To select the JMP 9600 hardware profile:
From the Options menu, locate the JMP 9600 Hardware Profile submenu and
select one of the listed options:
z V. 2.0 HD (Default)
z V. 2.0 2K
z V. 3.0 2K
A check mark appears beside the selected option.
NOTE: V. 3.0 2K supports high frame rates of 1920x1080 or 2K with frame rates of 48,
50, 59.94, or 60.
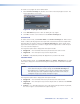
Validate Frames (Full Version Only)
This option validates the video data to be encoded for continuity and other frame
information. Validation detects errors before the encoding process begins. By using the
Validate Frames option you can validate a composition apart from encoding.
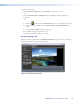
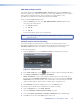
To start manual validation:
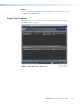
1. From the Options menu, select Validate Frames. The following screen opens:
Figure 15. Validate Screen
2. In the Video Path field, click the button to choose a folder containing video data.
3. Select Quick Validation or Complete Validation.
Quick Validation selects a small number of random frames to verify if their size is
the same whereas Complete Validation checks the sizes of all the frames. Complete
Validation can be used in instances such as when there is an issue with the encoded
content and you want to detect if there is a frame that is causing the issue.
4. Click Validate to begin the validation process or click Cancel to exit.
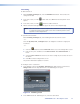
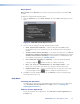
You can also choose whether frame validation occurs before encoding:
1. From the Options menu, select More Options.
2. Select the Validate frames before encoding check box.
3. Select either Quick Validation or Complete Validation as the validation type.
4. Click OK to return to the JPEG 2000 Encoder main screen.
JPEG 2000 Encoder • Encoding Procedure 24