
User Manual


Crop mode
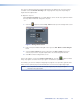
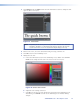
To enable crop mode:
On the Effect Settings tab, click Crop Mode.
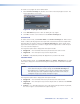
If the input frame is larger than the target frame, an image appears in the output
window with a light blue rectangle superimposed upon it.
NOTE: If the input frame is smaller than the target frame, Crop mode is not
available.
The blue rectangle represents the area that will be kept after the cropping is complete.
Cropping the image removes all pixels outside of the blue rectangle. The crop area can be
modified as needed.
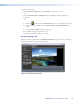
The image description that is displayed for this option includes:
z Image Size — The horizontal and vertical pixel format of the source frame
z Target Size — The desired pixel aspect of the output frame
z Position — The crop window location on the frame. The default position is the top left
of the output frame (pixels 0,0).
The size of the crop region can be any size from 32x16 pixels up to and including the target
resolution.
To reposition the image:
On the Effect Settings tab, click and drag the image on the screen.
- or -
Click the Up, Down, Left, and Right buttons to nudge the image in single-pixel
increments.
- or -
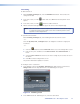
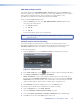
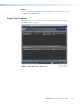
1. Click the button beside the Position field to open the Change Value screen.
Figure 8. Change Value Screen
2. Enter specific pixel coordinates in the New Position X and New Position Y
fields.
3. Select the Save values check box if desired.
4. Click OK to exit the Change Value screen.
The position information updates in real time.
JPEG 2000 Encoder • Encoding Procedure 17