
User Manual

Encoding
Procedure
This section describes the process of encoding content for the JMP 9600. Topics that are
covered include:
z Encoding Overview
z Main Menu Options
z Single Clip Encoding
z Batch Encoding
z Status Indication
z Encoding Across Multiple Computers (Remote Machines)
Encoding Overview
The main steps for encoding content for the JMP 9600 are as follows:
1. Check that the hardware profile matches the player type for which you are encoding
content (see “JMP 9600 Hardware Profile”).
2. From the Tasks menu, select Encode to open the Encode Settings screen (see “Tasks
Menu”).
3. Select the input data to be encoded (such as image frames and audio files) (see
“Inputs”).
4. Set the encoding parameters (see “Encoding parameters”).
5. Add remote machines to function as an encoding array (optional for full version)
(see “Encoding Across Multiple Computers [Remote Machines]”).
6. Name the DCP and choose a storage location on the local disk drive for the final output
(see “Outputs”).
7. Perform any editing tasks (see “Effect Settings tab“ and “Drawing Settings tab”).
8. Encode the content (see “Single Clip Encoding“ and “Batch Encoding”).
NOTES: • The source data for encoding as well as the resultant output DCP resides on
the local computer even if an encoding array is employed, unless the input
path, output path, or both is a remote machine mapped on the network.
• Ensure that frame file names that include a numerical component use the
same number of digits in all file names.
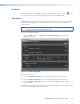
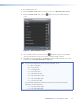
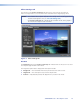
Main Menu Options
The options available through the menu bar of the JPEG 2000 Encoder are used to access
certain configuration settings. Modify these settings as needed before beginning an
encoding session.
JPEG 2000 Encoder • Encoding Procedure 9