
User Guide User guide

FOX II DP Transmitter and Receiver • Installation and Operation
9
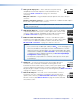
Front panel
1 2
CONFIG
FOX II T DP
SELECT
HDCP
SIGNAL
RETURN OUT
INPUT
VIDEO AUDIO EDID
1011
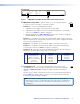
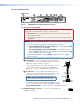
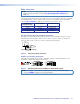
Figure 3. FOX II DP Transmitter Front Panel Control and Connector
j EDID Select rotary switch — Set this switch to one of the positions below
SELECT
EDID
to select the source of the DDC or a specific resolution.
Position 0 — A user-recorded EDID that has been:
• Captured from the display connected to the receiver output.
• Captured from the display connected to transmitter DisplayPort Loop-through
connector (see item
b
on figure 2 on page 6).
• Manually imported via an SIS command (see page 21) or Product Configuration
Software action (see page 32) to the transmitter.
Position 1 — The EDID is selected via the rear panel Remote RS-232 port or the front
panel Configuration port, using an SIS command or the Product Configuration Software.
This is the factory default position.
Position 2 — The EDID is received from the display connected to the receiver.
Position 3 — The EDID is received from the display connected to the DisplayPort
Loop-through connector (see item
b
on figure 2 on page 6).
Position 4 – F — Specify a resolution. The table below identifies the switch positions
and the associated resolutions. All resolutions are at 60 Hz.
Pos. Source or resolution Pos. Resolution Pos. Resolution
0 User recorded EDID 6 1280x800 C 1920x1080 (1080p)
1 Selected via RS-232 7 1366x768 D 1920x1200
2 Display on Rx output 8 1400x1050 E 2048x1536
3 Display on Tx loop-through 9 1440x900 F 2560x1600
4 1024x768 A 1600x1200
5 1280x720 (720p) B 1680x1050
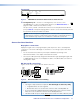
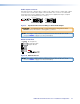
k Configuration port — Connect a controlling device, such as a PC, to this
CONFIG
mini USB B port for control of all FOX II T DP functions and to install a firmware
upgrade (see Remote Control on page 18 for SIS commands and software
control).
This port serves a similar communications function as the rear panel Remote RS-232
port (see item
g
on page 7), but it is easier to access than the rear port after the
transmitter has been installed and cabled.
NOTE: A front panel Configuration port connection and a rear panel Remote
RS-232 port connection can both be active at the same time. If commands are
sent simultaneously to both, the command that reaches the processor first is
handled first.