User Guide EDID Management EDID 101H EDID Emulator with EDID Minder for HDMI 68-2439-01 Rev.
Safety Instructions Safety Instructions • English WARNING: This symbol, , when used on the product, is intended to alert the user of the presence of uninsulated dangerous voltage within the product’s enclosure that may present a risk of electric shock. ATTENTION: This symbol, , when used on the product, is intended to alert the user of important operating and maintenance (servicing) instructions in the literature provided with the equipment.
FCC Class A Notice This equipment has been tested and found to comply with the limits for a Class A digital device, pursuant to part 15 of the FCC rules. The Class A limits provide reasonable protection against harmful interference when the equipment is operated in a commercial environment. This equipment generates, uses, and can radiate radio frequency energy and, if not installed and used in accordance with the instruction manual, may cause harmful interference to radio communications.
Conventions Used in this Guide Notifications The following notifications are used in this guide: ATTENTION: Attention indicates a situation that may damage or destroy the product or associated equipment. NOTE: A note draws attention to important information. TIP: A tip provides a suggestion to make working with the application easier.
Contents Introduction............................................................ 1 Remote Communication and Control............ 12 About this Guide.................................................. 1 About the EDID 101H.......................................... 1 EDID 101H Features............................................ 1 Application Diagram............................................ 2 Using Simple Instruction Set (SIS) Commands... 12 Host-to-device Communications...................
EDID 101H • Contents vi
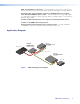
Introduction This section describes this user guide and the EDID 101H, including: • About this Guide • About the EDID 101H • EDID 101H Features • Application Diagram About this Guide This guide contains information about the Extron EDID 101H with instructions on how to install, configure, and operate the unit. Throughout this guide the EDID 101H is referred to as the “EDID 101” or the “device”. About the EDID 101H The Extron EDID 101H is an HDCP compliant EDID Emulator for HDMI signal sources.
HPD - Hot Plug Detect control port — Provides unique contact closure control port for remote cameras and other devices that require a periodic HPD trigger for proper operation. Automatic input cable equalization to 50 feet at 1080p60 with 8-bit color when used with Extron HDMI Pro Series cable — Actively conditions incoming HDMI signals to compensate for signal loss when using long cables, low quality cables, or source devices with poor signal output.
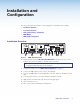
Installation and Configuration This section describes the installation, and configuration of the EDID 101H, including: • Installation Overview • Front Panel Features • Rear Panel Features and Cabling • EDID Minder • EDID 101H Configuration Installation Overview EDID A BC F 01 2 3 4 56 7 C D E 1 Figure 2. INPUT OUTPUT 2 3 4 5 ON HPD A B 89 A EDID STORE B POWER 12V 0.3A MAX 6 1 2 3 7 8 9 EDID 101H Rear Panel 1. Mount the EDID 101H (see Mounting the EDID 101H on page 15).
Front Panel Features 1 2 CONFIG Extron Figure 3. SIGNAL 3 4 IN OUT HDCP EDID 101H EDID 101H Front Panel Indicators and Configuration Port a b Power LED – Lights green when an external power supply is connected and powered. c Signal In LED – Lights green when an HDMI signal is detected on the input. Config port – Connect a host computer using a USB mini type‑B connector for configuration using SIS commands, and for firmware updates (see Connecting to the USB Port on page 16).
Rear Panel Features and Cabling EDID A BC F 01 2 3 4 56 7 C D E 1 Figure 4. a INPUT OUTPUT 2 3 4 5 ON HPD A B 89 A EDID STORE B POWER 12V 0.3A MAX 6 1 2 3 7 8 9 EDID 101H Rear Panel Power Connector – Connect the included 12 VDC power supply to this two‑pole, 3.5 mm captive screw connector. Rear Panel Power Receptacle DC Power Cord Captive Screw Connector Ground +12 VDC AC Power Cord Figure 5.
b HDMI input – Connect an HDMI source to this female HDMI type-A connector. HDCP – When required, the HDMI input negotiates and authenticates HDCP with a source device. The authentication process is repeated when a stored EDID is changed. c HDMI output – Connect a display or other output device to this female HDMI type‑A connector. The HDMI output provides +5 VDC, (up to 250 mA with over-current protection) on pin 16.
d EDID Store LED – One bi-color LED lights green when power is connected. It flashes amber when reading and storing EDID from a connected output device, returning to green when recording is complete. e EDID Store button – One recessed push button initiates both reading and storing EDID. With both A and B DIP switches set off (down), press the store button to read the EDID of a device connected to the output. The EDID is then stored to a user slot selected by the rotary switch.
EDID Minder EDID Minder ensures that the connected source sees the EDID of a display, even if a display is not connected. Depending on the EDID mode selected, the EDID of a connected display can be stored automatically, or the user can manually select from the table of factory loaded EDID files. This EDID is stored in the EDID 101H. Automatic Mode In automatic mode (see Record EDID Automatically: on page 11), the EDID 101H automatically reads and stores EDID from the connected output.
EDID 101H • Installation 9 Up (ON) Up (ON) Up (ON) Up (ON) Up (ON) Up (ON) Up (ON) Up (ON) Up (ON) Up (ON) Down (OFF) Down (OFF) Down (OFF) Down (OFF) Down (OFF) Down (OFF) Down (OFF) Down (OFF) Down (OFF) Down (OFF) 22 23 24 25 26 27 28 29 30 31 32 F E D C B A 9 8 7 6 5 4 3 2 1 0 F E D C B A 9 8 7 6 5 4 3 2 1 0 576p 480p 2048x1080 1920x1200 1680x1050 1600x1200 1600x900 1440x900 1400x1050 1366x768 1360x768 1280x1024 1280x800 1280x
Footnotes for the EDID table (see page 9) The following footnotes apply to the EDID table on the previous page: 1 Rate Type • PC – These EDIDs are primarily VESA standard computer rates, based on the most commonly used native resolutions. They are designed for use with computer sources. • HDTV – These EDIDs are video rates standardized by SMPTE and CEA. They are designed to be used with video and computer sources. 2 Video Format • DVI – These EDIDs are 128-byte EDID files, which specify a DVI sink.
EDID 101H Configuration The EDID 101H can be configured prior to installation. EDIDs are recorded from a display or a pre-programmed EDID is selected. TIP: If access to the EDID 101H is restricted after mounting or installation, configure the EDID 101H prior to the installation. Assign Pre-programmed EDID: Configure the DIP switches and rotary switch corresponding to the desired native rate, video format, and audio format (see EDID 101H Memory Slot Locations on page 9).
Remote Communication and Control This section describes remote operation of the EDID 101H. Topics include: • Using Simple Instruction Set (SIS) Commands • Command and Response Table for SIS Commands Using Simple Instruction Set (SIS) Commands The EDID 101H is remotely set up and controlled using Extron SIS commands issued from a host computer or other device, such as a control system.
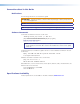
Error Responses If the device is unable to execute a command it receives because the command is invalid or contains invalid parameters, the device returns an error response to the host. The following error response codes can be sent: E01 – Invalid input channel number (out of range) E10 – Invalid command E13 – Invalid value (out of range) Using the Command and Response Table The command and response table is shown on the following pages.
Command and Response Table for SIS Commands ASCII Command (Host to Device) Response (Unit to Device) X! B Vmt X! ] B X! ] X! Z Amt X! ] Z X! ] Request status of all signals E LS } DIP C (HDCP authorized) status E STAT } SigI X! • SigO X! • HdcpI X! • HdcpO X!] Show signal presence or absence for all inputs and the output.
Reference Information • Mounting the EDID 101H • Connecting to the USB Port • DataViewer • Updating the Firmware Mounting the EDID 101H The one inch high, quarter-rack width three inch deep enclosure can be • Set on a table, • Mounted on a rack shelf, • Mounted under a desk or table-top. Desktop Placement Attach the four provided rubber feet to the bottom of the EDID 101H and place it in any convenient location.
Connecting to the USB Port A mini type- B USB Config port located on the front panel (see Front Panel Features on page 4) is used to connect to a host computer for configuration using SIS commands with Extron DataViewer, or for updating firmware with the Extron Firmware Loader utility. DataViewer and Firmware Loader are available at www.extron.com. The programs are also necessary to install the USB driver to the connected computer.
4. Click Next. 5. The following dialog box opens: Found New Hardware Wizard Welcome to the Found New Hardware Wizard This Wizard helps you install software for: Extron USB Device If your hardware came with an installation CD or floppy disk, insert it now. What do you want the wizard to do? 4 Install the software automatically [Recommended] Install from a list or specific location [Advanced] Click Next to continue 5 Next > Cancel Figure 10.
DataViewer DataViewer is an enhanced terminal emulation program that facilitates analysis of RS-232, USB, and TCP/IP communication with Extron devices. The software allows users to send commands to a device and view the responses in ASCII or hexadecimal format. Command and response logs can be saved in text or HTML format. DataViewer is available at www.extron.com. Enter DataViewer in the search engine to locate the program.
Updating the Firmware Firmware updates are released periodically on the Extron website. You can find the version currently loaded on your device using SIS commands (see Command and Response Table for SIS Commands on page 14). Compare this with the latest release for the EDID 101H on the Extron website and decide whether to update your firmware. TIP: Read the Release Notes provided on the website with the latest firmware to determine whether you need the latest version.
Downloading EDID 101H Firmware To obtain the latest version of firmware for your device: 1. Go to the Extron website at www.extron.com and click the Download tab. 2. On the Download Center page, click the Firmware link from the list on the left sidebar menu. 3. The firmware files are arranged in alphabetical order. Click the “E” at the top the page, then locate EDID 101H firmware file and click its Download link. NOTE: Click Release Notes. These notes show the issues addressed by the latest update.
4. On the Add Device dialog, select EDID 101H from the Device Names drop-down list. 5. From the Connection Method drop-down list, select USB. 6. Click Connect. If the connection is successful, EDID 101H is displayed in green in the Connected Device panel, followed by a green check mark. 4 EDID 101H USB 5 EDID 101H 6 Connect Connected Device Device Name: EDID 101H New Firmware File (Optional) Path: 7 Browse Add Figure 13. Add Device Dialog 7.
NOTES: • The original factory-installed firmware is permanently available on the EDID 101H. If the attempted firmware upload fails for any reason, the unit reverts to the factory version. • When downloaded from the Extron website, by default the firmware is placed in a folder at C:\Program Files\Extron\ Firmware\EDID 101H (Windows XP) or C:\Program Files (x86)\Extron\ Firmware\EDID 101H (Windows 7). The path to the new firmware file is in the Path field (see figure 15). Add Device...
10b 11 EDID 101H 60-1205-01 1.00.00 edid_101h_v1.00.001... Extron USB Device Connected Figure 16. Firmware Loader Screen with an EDID 101H Added 10. If there are multiple devices listed, but you do not want to upload the firmware to all, remove one or more using the Devices panel. To remove one or more devices: a. In the Device (n) panel, highlight the names of devices to delete by clicking on them. A checkmark is placed in the first column of each selected device. b.
Extron Warranty Extron Electronics warrants this product against defects in materials and workmanship for a period of three years from the date of purchase.