
User Guide User guide


3. After tapping the fourth cross, the unit saves the calibration data and restarts the
sequence. Repeat the process for each connected touchscreen.
4. Press any front panel button to exit the sequence and save the data.
NOTE: See page 32 for detailed touchscreen setup instructions.
Capture/Recall Settings (front panel activated)
A snapshot of the currently displayed image (including annotations) can be captured and
saved to the Annotator memory using the front panel Capture/Recall button, the Next
button, and the two Adjust knobs. This image or any other saved image can then be
recalled and output to the active display at a later time.
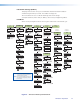
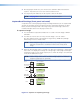
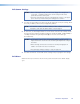
To capture an image:
1. Press and hold the Capture/Recall button for 3 seconds. The LCD displays “IMAGE
CAPTURE”.
2. Press Next to enter the Save As menu, the LCD displays “Save As: <N/A>”.
Use either Adjust knob to scroll through 16 image names, (IMG01.bmp through
IMG16.bmp) to select a suitable name.
NOTE: When saving an image to a selected name, any image previously saved
with that selected name is overwritten in favor of the newly saved
image.
3. When the desired image name is reached, press Next. The LCD displays “Saving image
Please wait.” The display then changes to “Saving image” and a progress bar begins
showing the progress of the image capture process. When the image is saved the LCD
reverts to the default menu cycle.
NOTE: Custom image names can be used when image captures are initiated
using the appropriate SIS commands.
Press and hold
for 3 seconds.
CAPTURE/
RECALL
IMAGE
CAPTURE
Step 1
LCD screen displays
UNDO/
CLEAR
ADJUST
Rotate either
Adjust knob.
Save As:
<N/A>
MENU
NEXT
Press
LCD screen displays
Save As:
IMG05.BMP
LCD screen displays
Saving Image
Please wait
MENU
NEXT
Press
LCD screen displays
then
Saving image:
Step 2
Step 3
Figure 13. Sequence for Capturing an Image
Annotator • Operation 22