
User Guide User guide


Input Conguration
Within this menu any of the seven inputs can be congured. Each input has different
settings depending on the signal format. Consult the tables below for signal formats per
input and possible adjustments per signal format.
To configure inputs:
1. From the top level Input Configuration menu press the Next button to bring up the
input selection screen. The active input is displayed on the LCD with current signal
format.
NOTE: If the input shown is not the one to be adjusted, press the desired input
button.
2. With the correct input displayed, rotate the right Adjust knob ({) to change the signal
format (refer to table below for signal type per input).
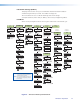
Input 1 Input 2 Input 3 Input 4 Input 5 Input 6 Input 7
*RGB *RGB *RGB *YUVi *S-Video *DVI *SDI
YUVp/HDTV YUVp/HDTV YUVp/HDTV S-Video Composite HD-SDI
Auto Detect Auto Detect RGBcvS Composite Auto Detect Auto Detect
YUVi Auto Detect
S-video
Composite
Auto Detect
Figure 10. Signal Formats per Input (*= Default Value)
3. Press the Next button to go to the next setting. If necessary repeat pressing Next until
the desired level is attained. Refer to the table below for adjustable settings for each
signal format.
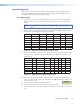
Input Format RGB YUVp/HDTV RGBcvS YUVi S-vid DVI SDI HD-SDI
Film Detect X X X X X X X X
H Start X X
V Start X X
Phase X X
Total Pixels X X
Active Pixels X X X X X X X
Active Lines X X X X X X X
Figure 11. Adjustments Possible per Signal Format
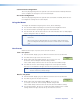
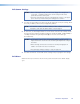
4. At the desired setting (for example, Horizontal Start on input 2 with a YUVp/HDTV
signal, see image at right), rotate the right Adjust knob ({) to adjust the settings value
as desired (here to 122).
5. Repeat steps 3 and 4 for each setting as desired.
6. When complete press Menu once or Next repeatedly to return
to the top level menu. Alternatively, allow the unit to time out to return to the default
cycle.
Input #2
Horz Start 122
Annotator • Operation 19