
User Guide User guide


Resetting the Unit with the Reset Button
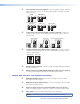
There are four reset modes (numbered 1, 3, 4, and 5 for the sake of comparison with
Extron IPL products) that you can access by pressing the Reset button on the rear panel.
The Reset button is recessed, so use a pointed stylus, ballpoint pen, or Extron Tweeker to
press it. See the table on page 13 for a summary of the reset modes.
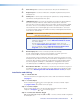
CAUTION: Review the reset modes carefully. Using the wrong reset mode may result
in unintended loss of flash memory programming, port reassignment, or
processor reboot.
NOTE: The reset modes listed in the table close all open IP and Telnet connections and
close all sockets. Also, each mode is a separate function, not a continuation
from mode 1 to mode 5.
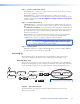
RESET
RESET
RESET
RESET
Release, then immediately
press and release again. Reset
LED flashes in confirmation.
Modes 3, 4, and 5
Press and hold
the Reset button.
Mode 1
Reset LED flashes once,
twice, or three times.
Press and hold for
3, 6, or 9 seconds.
Apply Power
1
2
RESET
Release Reset button.
Figure 5. Resetting the Annotator
NOTE: After a mode 1 reset is performed, update the Annotators’s firmware to the
latest version. Do not operate the firmware version that results from the
mode 1 reset. If the factory default firmware is to be used, that version must
be uploaded again.
If you do not want to update firmware, or you performed a mode 1 reset by
mistake, cycle power to the device to return to the firmware version that was
running before the mode 1 reset. Use the 0Q SIS command to confirm that
the factory default firmware is no longer running (look for the asterisk [*]
following the version number).
See the table on next page for a summary of the reset modes.
12
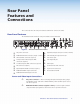
Annotator • Rear Panel Features and Connections