User’s Manual IPL M PDP-ES IP Link Tools www.extron.com Extron Electronics, USA Extron Electronics, Europe Extron Electronics, Asia Extron Electronics, Japan 1230 South Lewis Street Anaheim, CA 92805 USA 714.491.1500 Fax 714.491.1517 Beeldschermweg 6C 3821 AH Amersfoort The Netherlands +31.33.453.4040 Fax +31.33.453.4050 135 Joo Seng Road, #04-01 PM Industrial Building Singapore 368363 +65.6383.4400 Fax +65.6383.4664 Daisan DMJ Building 6F 3-9-1 Kudan Minami Chiyoda-ku, Tokyo 102-0074 Japan +81.3.
Precautions Safety Instructions • English This symbol is intended to alert the user of important operating and maintenance (servicing) instructions in the literature provided with the equipment. This symbol is intended to alert the user of the presence of uninsulated dangerous voltage within the product's enclosure that may present a risk of electric shock. Caution Read Instructions • Read and understand all safety and operating instructions before using the equipment.
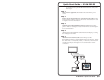
Quick Start Guide — IPL M PDP-ES To install and set up the IPL M PDP-ES interface card, follow these steps: Step 1 Turn all of the equipment off and disconnect it from the power source. Step 2 Remove the preinstalled Pioneer communication ES card from the Pioneer plasma. Refer to Removing the Pioneer communication ES card in chapter 2 for more information. Step 3 Install the Extron IPL M PDP-ES interface card into the Pioneer plasma.
Quick Start Guide — IPL M PDP-ES, cont’d Chapter 1 • Introduction .......................................................... 1-1 Step 6 Attach the serial communication cable to the RS-232 port of the IPL M PDP-ES interface card within the Pioneer plasma. Attach the other end to a controller or host PC, as shown under step 5. Step 7 Configure the IPL M PDP-ES interface card using the ARP command. Refer to IPL M PDP-ES interface card configuration in chapter 3 for more information.
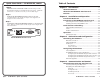
Table of Contents, cont’d Programmer’s Guide for the Telnet and Web Browser ..................................................................................... 4-18 Using the command/response table ................................... 4-18 Symbol definitions .............................................................. 4-19 Copyright information ....................................................... 4-21 Password information ........................................................ 4-21 Error responses ..
Introduction About this Manual This manual contains information about the Extron IPL M PDP-ES interface card, including its installation, configuration, and operation. This compact Ethernet interface card installs into the Expansion Solutions (ES) slot of a compatible Pioneer plasma display.
Introduction, cont’d IPL M PDP-ES 2 Chapter Two Installation and Operation Installation Overview Installation of the IPL M PDP-ES Interface Card Panel Features and Cabling Operation 1-4 IPL M PDP-ES • Introduction
Installation and Operation Installation Overview To install and set up the IPL M PDP-ES interface card, follow these steps: 1 Turn all of the equipment off. Make sure that the Pioneer plasma is turned off and disconnected from its power source. 2 Remove the Pioneer communication ES card from the plasma. 3 Install the Extron IPL M PDP-ES interface card. 4 Attach the LAN and serial cables to the Extron interface card. See Connecting the Hardware in chapter 3.
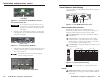
Installation and Operation, cont’d Panel Features and Cabling See figure 2-6 below for detailed information about connections, LEDs, and power. RS-232 RESET IPL M PDP-ES Push gently Figure 2-3 — Inserting the IPL M PDP-ES card into the communication slot CAUTION 2. Be very careful when inserting the card. Do not use excessive force, and push the card in as straight as possible; a crooked entry could damage the card or the plasma.
Installation and Operation, cont’d 5 Reset button (recessed) — See Resetting the unit, later in this chapter, for additional details on this multiple function reset button. RS-232 communication 6 RS-232 port — Plug a serial cable into this 9-pin D connector for a serial connection. Resetting the unit There are five reset modes available by using the Reset button ( 5 ) on the front panel. The Reset button is recessed, so use of a pointed stylus, ballpoint pen, or Extron Tweeker is suggested.
Installation and Operation, cont’d • If events are currently running following the momentary (<1 second) press, the Power LED flashes three times, indicating the stopping of events. IPL M PDP-ES Each flash lasts for .25 seconds. Nothing happens if the momentary press does not occur within 1 second. Mode 4 — Holding the reset button until the Power LED blinks twice (6 seconds), followed by a momentary (<1 second) press resets IP settings.
Connection and Configuration Connecting the Hardware 3. The IPL M PDP-ES interface card is housed inside of an expansion slot (namely, the ES Card Slot) of a fourth generation Pioneer plasma. Figure 3-1 illustrates a typical setup. Ensure that your PC is connected to the network switch, hub, or router. RS-232 port The IPL M PDP-ES can be connected to a controller device or a local PC through its RS-232 port. PC connection 1.
Connection and Configuration, cont’d IPL M PDP-ES card for DHCP (Dynamic Host Configuration protocol) to have an address assigned automatically. Enter the desired new IP address and the MAC address (located on the face panel) for the interface card. For example: IPL M PDP-ES interface card configuration arp –s 10.13.170.15 00-05-A6-00-0A-90 When you connect with the IPL M PDP-ES card for the first time, there are three ways to set up the IP address: 1. Use the ARP command method. 2.
Connection and Configuration, cont’d 6. After verifying that the change was successful, issue the arp –d command at the DOS prompt. For example: arp –d 10.13.170.15 removes 10.13.170.15 from the ARP table or arp –d removes all static IP addresses from the ARP table. 1. Plug one end of a Cat 5, crossover Ethernet cable into the LAN connector of the IPL M PDP-ES interface card. Refer to figure 2-7 for RJ-45 connector wiring. Subnet mask: 255.255.0.0 Save the changes and exit the Network setup.
Connection and Configuration, cont’d Firmware upgrades IPL M PDP-ES Firmware upgrades become available periodically as improvements are made to the versatility and functionality of the IPL M PDP-ES interface card. These upgrades are available for download from the Extron Web site. For details on how to upgrade the firmware, see Upgrading the firmware in chapter 4.
Communication and Control Communication with the Interface Card The on-board Web server has a set of built in, default Web pages, which can be accessed via a Web browser. These pages are used to control the IPL M PDP-ES interface card within the Pioneer plasma, as well as monitoring and scheduling events. In using Internet Explorer (version 5.5 or higher), you must also have Microsoft Script (version 5.6 or higher).
Communication and Control IP settings fields The IP settings fields provide a location for viewing and editing settings unique to the interface card. After editing any of the settings on this page, click the Submit button. Explanations for some of these fields follow. Gateway IP address The Gateway IP Address field identifies the address of the gateway to the mail server to be used if the interface card and the mail server are not on the same subnet.
Communication and Control, cont’d Passwords page The fields on the Passwords page are for entering and verifying passwords. Passwords are case sensitive and are limited to 12 uppercase and lowercase alphanumeric characters. Each password must be entered twice; once in the Password field and then again in the Re-enter Password field. Characters in these fields are masked by asterisks (*****). The following characters are invalid in passwords: {space} + ~ @ = ‘ [ ] { } < > ’ “ ; : | \ and ?.
Communication and Control, cont’d notification indicating the number of operation hours remaining). The scheduled notification is sent to the appropriate mailbox. 7. Click System Settings on the menu (figure 4-2) on the left side of the window. 8. Place the gateway IP address into the Gateway IP Address field. 9. Click the Submit button. To edit notification email addresses from the Email Alerts page: 1.
Communication and Control, cont’d Update the firmware as follows: 1. Visit the Extron web site at www.extron.com. 2. Select the IPL product category from the “Product Shortcut” drop-down box, and select the latest firmware file for download. 3. Note the folder to which you save the firmware file. 4. Access the IPL M PDP-ES interface card using the on-board Web server. 5. Select the Configuration tab. 6. Click the Firmware Upgrade link on the left side of the Configuration page. 7.
Communication and Control, cont’d If you wish to delete all files, click the Delete All button from the root directory. The file count reverts to 0, and all subsequent pages will be deleted. password level, the buttons and fields on this page allow you to control and/or view the status of the Pioneer plasma display. Explanations for some of these functions follow. If the last file in a directory is deleted, the empty directory is automatically deleted.
Communication and Control, cont’d Control for Input 3, Input 4, and Input 5 is available only with use of the Expansion Solution video slots for the PDA-5003 or PDA-5004 interface card. See the Pioneer Operating Instructions for additional information. Viewing the on-screen menu on the Pioneer plasma will disable communication with and control of the display. A warning message will appear on the Web page if the on-screen menu is accessed.
Communication and Control, cont’d Energy Save When an energy save function is selected, power consumption is reduced compared to the normal operating mode. When set to Auto, this sensor measures the level of light inside the viewing room. See the Pioneer Operating Instructions for additional information. Schedule page Using the schedule page (figure 4-12), you can create scheduled events such as power on/off, input changes, or send status email.
Communication and Control, cont’d example of each command in ASCII (Telnet) and URL Encoded (Web). Programmer’s Guide for the Telnet and Web Browser Upper and lower case text can be used interchangeably except where noted. Using the command/response table The following are either Telnet (port 23) or Web browser (port 80) commands. There are some minor differences when you are implementing these commands via Telnet or via URL encoding using a Web browser.
Communication and Control X13 = Set local date and time format (MM/DD/YY-HH:MM:SS) (e.g., 11/18/04-10:54:00) There is a 7 character limit for full file names. It is advised that you use numeric titles (e.g., 1.eml, 24.eml). Numeric titles reduce the characters of the file name, and assist in keeping the alert files organized. However, alphabetical titles are permitted. Read local date and time format (day of week, date month year HH:MM:SS) (e.g., Thu, 18 Nov 2004 18:19:33) = IP address (xxx.xxx.xxx.
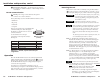
E12 — Invalid port number E13 — Invalid parameter E14 — Not valid for this configuration E17 — System timed out E22 — Busy E24 — Privilege violation E25 — Device not present E26 — Maximum number of connections exceeded E27 — Invalid Event number E28 — Bad Filename/File not found References to errors (at command descriptions on the following pages) 14 4-22 = Commands that give E14 (Invalid Command for this configuration) if sent to Extron product whose current configuration does not support the command.
4-24 IPL M PDP-ES • Communication and Control Esc CC Get connection listing Esc CU Esc CK View user password24 View connection’s security level Esc DF Telnet text responses: filename x• date/time • length filename x• date/time • length filename x• date/time • length ... space_remaining • Bytes Left Esc LF List Files from current Dir.
4-26 Esc ..
Communication and Control, cont’d Pioneer Plasma A/V Device Control Zpx Zpq Del•filename Custom Web pages Zpf Ego Est ##### X69 X69 Pti 1* X69 Pti 0* X69 Response Once the IPL M PDP-ES interface card is configured, control of A/V devices may be accomplished in several ways. These include Web pages, Telnet, and direct port access. These pages can be either modified versions of the existing Web pages, or new Web pages developed in the field.
Communication and Control, cont’d 3. . At the < to > prompt, enter the IP address of the IPL M PDP-ES. (The default IP address is 192.168.254.254, but it may have been changed in the setup or configuration process. If it was changed, use the new address.) Telnet defaults to port 23. 4. Use port redirect to finish the process. See the next section for detailed instructions. You can force the direct access session to close by logging on as administrator and entering “Esc 1 * 0CD .
Communication and Control, cont’d 3. If contact is established with the unit, but the unit’s Web pages cannot be accessed by your Web browser, verify (in the Options or Preferences menu) that your Web browser is configured for direct network connection and not set up to use a proxy server. IPL M PDP-ES Serial connections 1. Ensure that Pioneer plasma ID is set to 01 (see the Pioneer plasma documentation for details). 2. Check to see that events are running. 3.
Specifications, Part Numbers, and Accessories Specifications Ethernet control interface Connectors .................................... 1 RJ-45 male connector Data rate ........................................ 10/100 Base-T, half/full duplex with autodetect Protocols ....................................... ARP, DHCP, ICMP (ping), TCP/IP, UDP/ IP, Telnet, HTTP, SMTP Default settings ............................ Link speed and duplex level = autodetected, IP address = 192.168.254.254, subnet mask = 255.255.
Specifications, Part Numbers, Accessories, cont’d IPL M PDP-ES B Appendix B Glossary A-4 IPL T S Series • Specifications, Part Numbers, and Accessories
Glossary GLOSSARY 10/100Base-T is Ethernet that uses Unshielded Twisted Pair (UTP - Cat 5, etc.) cable, in which the amount of data transmitted between two points in a given amount of time is equal to either 10 Mbps or 100 Mbps. Address Resolution Protocol (ARP) is a protocol that assigns an IP address to a device based on the device’s MAC or physical machine address. Custom Web-page is any file that can be loaded into an IPL box and served by the IPL’s internal Web-server.
Glossary, cont’d Port number is a preassigned address within a server that provides a direct route from the application to the Transport layer, or from the Transport layer to the application, of a TCP/IP system. Static IP refers to an IP address that has been specifically (instead of dynamically; see DHCP earlier in this chapter) assigned to a device or system in a network configuration.
Glossary, cont’d B-6 IPL M PDP-ES • Glossary