
User Guide


Installing the CS 26T in a Suspended Ceiling — Division of Labor
In a division of labor installation, an AV system contractor installs the CS 26T (final
installation phase). Use the following procedure:
NOTE: Observe all applicable building codes and local ordinances when installing the
speaker.
1. Disconnect power — Power down all attached devices before proceeding.
2. (If the ceiling tile is already cut and in place, skip this step.)
Cut a hole for the CS 26T speaker — Use the provided cutout template to outline
the hole to be cut in the ceiling tile as described below.
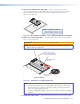
a. Remove the ceiling tile.
b. To find the center of the tile, use a tape measure to measure the space between
two opposite corners, and mark the half-way point.
c. Position the center hole of the cutout template directly over the center of the tile
that you marked in step2b.
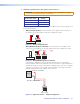
d. Using the provided cutout template, trace a circle on the ceiling tile as follows:
For installations in ceiling tiles that are NOT fiberglass: Trace a circle around
the CS 26T cutout template.
NOTE: The fiberglass tile adapters are not needed and can be discarded.
For installations in 1-inch (0.25 cm) thick fiberglass ceiling tiles with the
CS 120P:
NOTE: A set of fiberglass tile adapters is provided with both the CS 26T and
the CS 120P. Only one set is needed to install the CS 26T with the CS 120P
kit in a 1-inch (0.25 cm) thick fiberglass tile. The adapter works only with
1-inch (0.25 cm) thick fiberglass tile.
i. Place the fiberglass tile adapter around the outer diameter of the template that
was positioned in step 2c.
ii. Trace a circle around the outer diameter of the adapter.
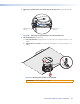
e. Cut out the circle traced in the ceiling tile.
f. Replace the tile in the ceiling, ensuring that the hole in the tile is
aligned with the hole in the CS 120P.
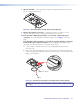
3. Route the speaker wires — Route the speaker wires through the
ceiling tile hole.
4. Remove the speaker grille — Carefully remove the grille from the front of the CS 26T.
NOTE: Grille hooks are provided for grille removal, if needed.
CS 26T and CS 120P User Guide • Installation 20