
Managing Faults on Virtual Services Platform 7200 Series and 8000 Series Version 5.1.2
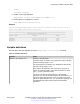
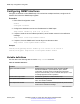
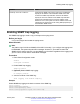

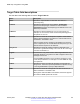
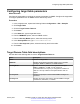
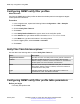
Table Of Contents
- Contents
- Chapter 1: Introduction
- Chapter 2: New in this document
- Chapter 3: Fault management fundamentals
- Chapter 4: Key Health Indicators using ACLI
- Chapter 5: Key Health Indicators using EDM
- Chapter 6: Link state change control using ACLI
- Chapter 7: Link state change control using EDM
- Chapter 8: Log and trap fundamentals
- Chapter 9: Log configuration using ACLI
- Configuring a UNIX system log and syslog host
- Configuring secure forwarding
- Installing root certificate for syslog client
- Configuring logging
- Configuring the remote host address for log transfer
- Configuring system logging
- Configuring system message control
- Extending system message control
- Viewing logs
- Configuring ACLI logging
- Chapter 10: Log configuration using EDM
- Chapter 11: SNMP trap configuration using ACLI
- Chapter 12: SNMP trap configuration using EDM
- Glossary

Configuring SNMP notify filter profiles
About this task
Configure the SNMP table of filter profiles to determine whether particular management targets
receive particular notifications.
Procedure
1. In the navigation tree, expand the following folders: Configuration > Edit > SnmpV3.
2. Click Notify Table.
3. Click the Notify Filter Table tab.
4. Click Insert.
5. In the NotifyFilterProfileName box, type a name for the notify filter profile.
6. In the Subtree box, type subtree location information in x.x.x.x.x.x.x.x.x.x. format.
7. In the Mask box, type the mask location in hex string format.
8. From the Type options, select included or excluded.
9. Click Insert.
Notify Filter Table field descriptions
Use the data in the following table to use the Notify Filter Table tab.
Name
Description
NotifyFilterProfileName Specifies the name of the filter profile used to generate notifications.
Subtree Specifies the MIB subtree that, if you combine it with the mask,
defines a family of subtrees, which are included in or excluded from
the filter profile. For more information, see RFC2573.
Mask Specifies the bit mask (in hexadecimal format) that, in combination
with Subtree, defines a family of subtrees, which are included in or
excluded from the filter profile.
Type Indicates whether the family of filter subtrees are included in or
excluded from a filter. The default is included.
Configuring SNMP notify filter profile table parameters
Before you begin
• The notify filter profile exists.
SNMP trap configuration using EDM
January 2017 Managing Faults on Avaya VSP 7200 Series and 8000 Series 68
Comments on this document? infodev@avaya.com