
Managing Faults on Virtual Services Platform 7200 Series and 8000 Series Version 5.1.2

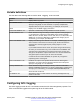
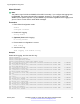
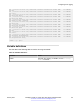
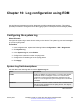
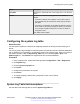
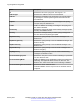
Table Of Contents
- Contents
- Chapter 1: Introduction
- Chapter 2: New in this document
- Chapter 3: Fault management fundamentals
- Chapter 4: Key Health Indicators using ACLI
- Chapter 5: Key Health Indicators using EDM
- Chapter 6: Link state change control using ACLI
- Chapter 7: Link state change control using EDM
- Chapter 8: Log and trap fundamentals
- Chapter 9: Log configuration using ACLI
- Configuring a UNIX system log and syslog host
- Configuring secure forwarding
- Installing root certificate for syslog client
- Configuring logging
- Configuring the remote host address for log transfer
- Configuring system logging
- Configuring system message control
- Extending system message control
- Viewing logs
- Configuring ACLI logging
- Chapter 10: Log configuration using EDM
- Chapter 11: SNMP trap configuration using ACLI
- Chapter 12: SNMP trap configuration using EDM
- Glossary

Switch:1# configure terminal
Add a force message control pattern. If you use a wildcard pattern (****), all messages undergo
message control.
Switch:1(config)# sys force-msg ****
Variable definitions
Use the data in the following table to use the sys force-msg command.
Table 13: Variable definitions
Variable Value
WORD<4-4> Adds a forced message control pattern, where WORD<4-4>
is a string of 4 characters. You can add a four-byte pattern
into the force-msg table. The software and the hardware log
messages that use the first four bytes that match one of the
patterns in the force-msg table undergo the configured
message control action. You can specify up to 32 different
patterns in the force-msg table, including a wildcard pattern
(****) as well. If you specify the wildcard pattern, all messages
undergo message control.
Viewing logs
View log files by file name, category, or severity to identify possible problems.
About this task
View ACLI command and SNMP trap logs, which are logged as normal log messages and logged to
the system log file.
Procedure
1. Enter Privileged EXEC mode:
enable
2. Show log information:
show logging file [alarm] [CPU WORD<0-25>] [detail] [event-code
WORD<0–10>] [module WORD<0–100>] [name-of-file WORD<1-99>] [save-to-
file WORD<1-99>] [severity WORD<0-25>] [tail] [vrf WORD<0–32>]
Example
Display log file information:
Switch:1>enable
Switch:1#configure terminal
Viewing logs
January 2017 Managing Faults on Avaya VSP 7200 Series and 8000 Series 51
Comments on this document? infodev@avaya.com