
Managing Faults on Avaya Virtual Services Platform 7200 Series and 8000 Series Version 4.2.1
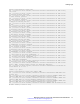

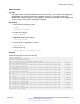
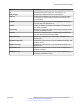
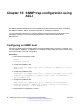
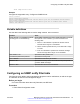
Table Of Contents
- Contents
- Chapter 1: Introduction
- Chapter 2: New in this release
- Chapter 3: Fault management fundamentals
- Chapter 4: Key Health Indicators using ACLI
- Chapter 5: Key Health Indicators using EDM
- Chapter 6: Link state change control using ACLI
- Chapter 7: Link state change control using EDM
- Chapter 8: RMON configuration using ACLI
- Chapter 9: RMON configuration using EDM
- Enabling RMON globally
- Enabling RMON on a port or VLAN
- Enabling RMON1 history
- Disabling RMON1 history
- Viewing RMON1 history statistics
- Creating an RMON1 alarm
- Creating an RMON1 port history alarm
- Viewing RMON1 alarms
- Deleting an RMON1 alarm
- Creating a default RMON1 event
- Creating a nondefault RMON1 event
- Viewing RMON1 events
- Viewing the RMON log
- Deleting an event
- Viewing the protocol directory
- Viewing the data source for protocol distribution statistics
- Viewing protocol distribution statistics
- Viewing the host interfaces enabled for monitoring
- Viewing address mappings
- Viewing the data source for host statistics
- Viewing network host statistics
- Viewing application host statistics
- Chapter 10: Viewing statistics using ACLI
- Chapter 11: Viewing statistics using EDM
- Chapter 12: Log and trap fundamentals
- Chapter 13: Log configuration using ACLI
- Chapter 14: Log configuration using EDM
- Chapter 15: SNMP trap configuration using ACLI
- Chapter 16: SNMP trap configuration using EDM
- Chapter 17: RMON alarm variables
- Glossary

show snmp-server host
Example
Configure the target table entry. Configure an SNMPv3 host.
Switch:1>enable
Switch:1#configure terminal
Switch:1(config)#snmp-server host 198.202.188.207 port 162 v2c ReadView inform timeout
1500 retries 3 mms 484
Switch:1(config)#snmp-server host 198.202.188.207 port 163 v3 authPriv Lab3 inform
timeout 1500 retries 3
Variable definitions
Use the data in the following table to use the snmp-server host command.
Variable Value
inform [timeout <1-2147483647>] [retries
<0-255>] [mms <0-2147483647>]
Sends SNMP notifications as inform (rather than trap). To use all
three options in one command, you must use them in the
following order:
1. timeout <1-2147483647> specifies the timeout value in
seconds with a range of 0–214748364.
2. retries <0-255> specifies the retry count value with a range
of 0–255.
3. mms <0-2147483647> specifies the maximum message
size as an integer with a range of 0–2147483647.
filter WORD<1-32> Specifies the filter profile to use.
noAuthNoPriv|authNoPriv|AuthPriv Specifies the security level.
port <1-65535> Specifies the host server port number.
WORD<1-32> Specifies the security name, which identifies the principal that
generates SNMP messages.
WORD<1-256> Specifies either an IPv4 or IPv6 address.
Configuring an SNMP notify filter table
Configure the notify table to select management targets to receive notifications, as well as the type
of notification to send to each management target.
Before you begin
• For more information about the notify filter table, see RFC3413.
Procedure
1. Enter Global Configuration mode:
Configuring an SNMP notify filter table
June 2015 Managing Faults on Avaya VSP 7200 Series and 8000 Series 99
Comments on this document? infodev@avaya.com