
Installation Instructions


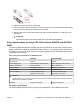

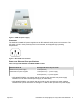
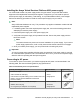
Table Of Contents
- Installation Job Aid (English) for Avaya VSP 4000 4850GTS
- How to get help
- Notices
- Safety messages
- Before you begin
- Installing the Avaya Virtual Services Platform 4000 on a table or shelf
- Installing the Avaya Virtual Services Platform 4000 in an equipment rack
- Installing SFP transceivers
- Removing SFP transceivers
- Power specifications for Avaya VSP 4000 switches 4850GTS and 4850GTS-PWR+
- Avaya Virtual Services Platform power supply power specification
- Installing the Avaya Virtual Services Platform 4000 power supply
- Connecting to AC power

3. Slide the switch into the rack as illustrated.
4. Insert and tighten the rack-mount screws.
Installing SFP transceivers
Install SFP transceivers by performing this procedure.
1. Remove the transceiver from the protective packaging.
2. Verify that the transceiver is the correct model for the network configuration.
3. Grasp the transceiver between your thumb and forefinger.
4. Insert the transceiver into the proper module on the switch. Apply a light pressure to the
transceiver until it clicks and locks into position in the module.
5. Remove the dust cover from the transceiver optical bores.
Removing SFP transceivers
Remove SFP transceivers by performing this procedure.
1. Disconnect the network fiber cable from the transceiver.
2. Use the locking mechanism on the transceiver to release it. The locking mechanism varies
from model to model as illustrated below.
July 2015 Installation Job Aid (English) for Avaya VSP 4000 4850GTS 6