
Installation Guide
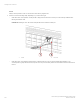
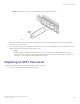
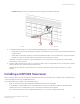

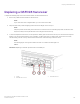
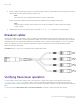

Table Of Contents
- ExtremeRouting SLX 9850-8 Hardware Installation Guide
- Preface
- About this Document
- Device Overview
- Preparing for the Installation
- Mounting the Device
- Initial Setup and Verification
- Initial setup and configuration checklist
- Items required
- Providing power to the device
- Establishing a serial connection
- Configuring a static IP address
- Establishing an Ethernet connection
- Customizing the chassis and host names
- Configuring the DNS service
- Setting the date and time
- Verifying correct operation
- Backing up the configuration
- Powering down the device
- Installing cable management kit
- Monitoring the Device
- Management Modules
- Interface Modules
- Power Supply Modules
- Power supply module overview
- Precautions specific to the power supply module
- Time and items required for removal and replacement
- Removing an AC power supply module
- Inserting an AC power supply module
- Removing a DC power supply module
- Inserting a DC power supply module
- Verifying power supply module operation
- High Voltage Power Supply Unit supporting AC and DC Voltages
- Fan Modules
- Switch Fabric Modules
- Transceivers and cables
- Supported transceivers and cables
- Time and items required
- Precautions specific to transceivers and cables
- Cleaning the fiber-optic connectors
- Managing cables
- Installing an SFP+ transceiver
- Replacing an SFP+ transceiver
- Installing a QSFP28 transceiver
- Replacing a QSFP28 transceiver
- Breakout cables
- Verifying transceiver operation
- Hardware Maintenance Schedule
- ExtremeRouting SLX 9850 Technical Specifications
- System specifications
- Ethernet
- LEDs
- Other
- Weight and physical dimensions
- Environmental requirements
- Power supply specifications (per PSU)
- Power consumption (typical configuration)
- Power consumption (maximum configuration)
- Power consumption (modules) (typical configuration)
- Power consumption (modules) (maximum configuration)
- Data port specifications (Ethernet)
- Serial port specifications (pinout RJ-45)
- Serial port specifications (protocol)
- Memory specifications
- Regulatory compliance (EMC)
- Regulatory compliance (safety)
- Regulatory compliance (environmental)
- Regulatory Statements
- Cautions and Danger Notices

Managing cables
The minimum radius that a 50 micron cable can be bent under full tensile load is 5.1 cm (2 in.). For a cable under no tensile load, that
minimum is 3.0 cm (1.2 in.). Cables can be organized and managed in a variety of ways, for example, using cable channels on the sides
of the rack or patch panels to minimize cable management. Following is a list of additonal recommendations:
• Plan for rack space required for cable management before installing the device.
• Leave at least 1 m (3.28 ft) of slack for each port cable. This provides room to remove and replace the device, allows for
inadvertent movement of the rack, and helps prevent the cables from being bent to less than the minimum bend radius.
• For easier maintenance, label the ber-optic cables and record the devices to which they are connected.
• Keep LEDs visible by routing port cables and other cables away from the LEDs.
• Do not route the cables in front of air vents.
• Use Velcro
®
type straps to secure and organize ber-optic cables.
• Route the cables away from LEDs to keep them visible.
• Use the cable management comb that attaches to the chassis for simple cable management. The comb can be installed without
service disruption.
CAUTION
Before plugging a cable into any port, be sure to discharge the voltage stored on the cable by touching the electrical
contacts to ground surface.
NOTE
Do not use tie wraps with optical cables because they are easily overtightened and can damage the optic
bers.
Installing an SFP+ transceiver
While non-Extreme optics are supported, Extreme
-qualied transceivers are recommended. The port might not become operational
using unqualied transceivers.
To insert an SFP+ transceiver, complete the following steps.
NOTE
Route cables to the side so that the line cards can be removed without disturbing the cables to the other line cards.
Installing an SFP+ transceiver
ExtremeRouting SLX 9850-8 Hardware Installation Guide
9035475-02 Rev AA 121