
Installation Guide


Brocade MLX Series and Brocade NetIron XMR Installation Guide 181
53-1004195-02
Installing a NetIron XMR 32000 router
DRAFT: BROCADE CONFIDENTIAL
5. Gently pull the release latch on the power supply front panel upward and toward the top of the power supply front panel. This
action locks the power supply in place. To prevent accidental removal you may screw the retaining screw into place along the top
of the latch.
6. Install a power supply slot blank into each empty slot.
For information about connecting power to the router, refer to “Connecting AC power” on page 181. For information about powering on the
system, refer to “Activating the power source” on page 185.
Connecting AC power
AC power is supplied through an AC power cord installed in each power supply in the NetIron XMR 32000 router.
NOTE
For the NEBS-compliant installation, AC power connections must use a surge protection router (SPD) to protect the AC power
supplies from damage due to excessive power line surges.
Follow these steps to connect AC power.
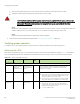
1. Locate the power receptacle on each power supply. Refer to Figure 131.
2. Lift the cord retainer and connect an AC power cord to the power supply.
3. Snap the cord retainer over the power plug to hold it in place.
FIGURE 131 NetIron XMR 32000 power supply receptacle and cord retainer
Connecting DC power
You can supply DC power to the NetIron XMR 32000 router using a DC-to-DC power supply. DC power must be supplied at 48 V and
60 A for 2400 W power supply and 48 V and 90 A for 3000 W power supply. The 2400 W DC-to-DC supply provides the DC power
to the router at 12 V and 200 A. The 3000 W DC-to-DC supply provides the DC power to the router at 12V and 245A.
The procedure in this section is for qualified service personnel.
Follow these steps to connect a DC power source.
1 Cord retainer 2 Power receptacle
AC OK
DC OK
ALM
1
2