
FIPS Security Seal Procedures for Brocade MLXe Series Brocade NetIron CES 2000 Series and Brocade NetIron CER 2000 Series


16 of 18 FIPS Security Seal
Publication Number: 53-1002118-01
Applying seals to Brocade NetIron CES 2000 Series and Brocade NetIron CER 2000 Series
devices
This section explains how to apply FIPS-compliant tamper-evident security seals to Brocade NetIron CES
2000 Series and Brocade NetIron CER 2000 Series devices listed in TABLE 2.
TABLE 2 Devices supporting FIPS-compliant tamper-evident security seals
Device series Supported devices Total number of seals required
to be placed on the device
Brocade NetIron CES 2000 Series
Brocade NetIron CES 2024C
Brocade NetIron CES 2024F
16 total seals
Brocade NetIron CES 2048C
Brocade NetIron CES 2048CX
Brocade NetIron CES 2048F
Brocade NetIron CES 2048FX
15 total seals
Brocade NetIron CER 2000 Series
Brocade NetIron CER 2024C
Brocade NetIron CER 2024F
16 total seals
Brocade NetIron CER 2028C
Brocade NetIron CER 2048CX
Brocade NetIron CER 2048F
Brocade NetIron CER 2048FX
15 total seals
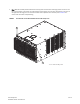
Use the figures in this section as a guide for security seal placement on a Brocade NetIron CER or CES series
device. The connectors on the faceplate of a particular model might vary, but the placement of the seals is the
same. Refer to TABLE 2 for the total number of seals required to be placed on each device.
Top: Affix one seal lengthwise completely covering the top rightmost screw that connects the faceplate to
the device. See FIGURE 9 for correct seal orientation and positioning.
Right and left sides: Affix seven seals on each side of the device. The seals placed on the sides must each
be vertically oriented and cover two open holes. See FIGURE 9 for correct seal orientation and positioning
on the right side. The orientation and placement of seals on the left side mirrors the orientation and
placement of seals on the right side. See FIGURE 10 for correct seal orientation and positioning on the left
side.