DRAFT: BROCADE CONFIDENTIAL 53-1002118-01 April 20, 2011 FIPS Security Seal Procedures for Brocade MLXe Series, Brocade NetIron CES 2000 Series, and Brocade NetIron CER 2000 Series 53-1002118-01 *53-1002118-01*
DRAFT: BROCADE CONFIDENTIAL © 2011 Brocade Communications Systems, Inc. All Rights Reserved. Brocade, the B-wing symbol, BigIron, DCFM, DCX, Fabric OS, FastIron, IronView, NetIron, SAN Health, ServerIron, TurboIron, and Wingspan are registered trademarks, and Brocade Assurance, Brocade NET Health, Brocade One, Extraordinary Networks, MyBrocade, VCS, and VDX are trademarks of Brocade Communications Systems, Inc., in the United States and/or in other countries.
DRAFT: BROCADE CONFIDENTIAL In this document This document explains how to apply FIPS-compliant tamper-evident security seals to the devices listed in TABLE 1.
DRAFT: BROCADE CONFIDENTIAL FIPS security seals Each seal in the Tamper Evident Seal kit measures 1.27 cm (.5 in.) by 3.18 cm (1.25 in.) and has a unique serial number printed on it. Seals must be correctly placed on each hardware device to satisfy the requirements for FIPS 140-2 Level 2 compliance. The seals should be stored in a room temperature environment, between 20 and 25°C (68 to 77°F). Avoid applying seals in environments where the temperature is 10°C (50°F) or less.
DRAFT: BROCADE CONFIDENTIAL Preparing to apply FIPS security seals The time to apply security seals varies by the number of seals required for a particular model. The application of seals to a Brocade MLXe device can take 10 minutes or longer. In addition to seal application time, the adhesive requires an additional 30 minutes to cure. Before beginning this task, ensure that you have the proper Tamper Evident Seals Kit and alcohol pads to clean the surfaces on which the seals will be affixed.
Applying seals to a Brocade MLXe-4 device Use the figures in this section as a guide for security seal placement on a Brocade MLXe-4 device. Each Brocade MLXe-4 device requires the placement of 14 seals: Front: Affix one seal from the top of the Management Module (MM) to the front panel of the chassis. Affix nine more seals—one from each module to the front panel of the chassis. See FIGURE 1 for correct seal orientation and positioning.
FIGURE 2 Rear and side view of a Brocade MLXe-4 device with security seals 4 3 2 1 1 to 4 = FIPS security seals FIPS Security Seal Publication Number: 53-1002118-01 7 of 18
Applying seals to a Brocade MLXe-8 device Use the figures in this section as a guide for security seal placement on a Brocade MLXe-8 device. Each Brocade MLXe-8 device requires the placement of 17 seals: • Front: Affix 15 seals—one seal from each module to the front panel of the chassis. The seal for the Management Module (MM) is vertically oriented and is positioned so that half is affixed to the top panel of the chassis and half of the seal is affixed to the control module.
Rear: Affix two vertically-oriented seals from the top panel of the chassis covering a portion of the fan unit lip. One seal will be to the left of the upper leftmost securing post; and the other seal will be to the right of the rightmost securing post. You must bend these seals to position them correctly. See FIGURE 4 for correct seal orientation and positioning.
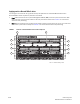
Applying seals to a Brocade MLXe-16 device Use the figures in this section as a guide for security seal placement on a Brocade MLXe-16 device. Each Brocade MLXe-16 device requires the placement of 24 seals: • • 10 of 18 Front: A total of 22 seals must be placed on the front panel of each Brocade MLXe-16 device. See FIGURE 5 for correct seal orientation and positioning.
FIGURE 5 Front view of a Brocade MLXe-16 device with security seals 1 22 2 21 20 5 4 3 19 18 7 6 17 16 9 8 15 14 10 13 11 12 1 to 22 = FIPS security seals FIPS Security Seal Publication Number: 53-1002118-01 11 of 18
FIGURE 6 Rear and side view of a Brocade MLXe-16 device with security seals 2 1 1 to 2 = FIPS security seals 12 of 18 FIPS Security Seal Publication Number: 53-1002118-01
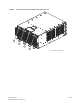
Applying seals to a Brocade MLXe-32 device Use the figures in this section as a guide for security seal placement on a Brocade MLXe-32 device. Each Brocade MLXe-32 device requires the placement of 58 seals: • Front: Affix a total of 48 seals to the front of the chassis. Affix 46 seals—two rows of 11 seals and two rows of 12—one from each module to the front panel of the chassis. All seals are oriented vertically, and each seal connects one module to the front panel of the chassis.
FIGURE 7 Front view of a Brocade MLXe-32 device with security seals 1-11 12-23 24 25 26-37 38-48 48 FIPS security seals 14 of 18 FIPS Security Seal Publication Number: 53-1002118-01
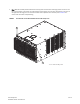
FIGURE 8 Rear and side view of a Brocade MLXe-32 device with security seals 10 1 9 2 8 3 7 4 6 5 1 to 10 = FIPS security seals FIPS Security Seal Publication Number: 53-1002118-01 15 of 18
Applying seals to Brocade NetIron CES 2000 Series and Brocade NetIron CER 2000 Series devices This section explains how to apply FIPS-compliant tamper-evident security seals to Brocade NetIron CES 2000 Series and Brocade NetIron CER 2000 Series devices listed in TABLE 2.
Front: On Brocade NetIron CER 2024C, Brocade NetIron CER 2024F, Brocade NetIron CES 2024C, and Brocade NetIron CES 2024F devices, affix one seal from the front panel to the bottom panel. See FIGURE 9 for correct seal orientation and placement.
Rear: Affix three seals from the top panel to the rear panel. Affix one seal from the rear panel to the bottom panel. See FIGURE 10 for correct seal placement and orientation.