Advanced System Diagnostics and Troubleshooting Guide ExtremeWare Software Version 7.8 Extreme Networks, Inc. 3585 Monroe Street Santa Clara, California 95051 (888) 257-3000 http://www.extremenetworks.
©2005 Extreme Networks, Inc. All rights reserved. Extreme Networks, ExtremeWare, Alpine, and BlackDiamond are registered trademarks of Extreme Networks, Inc. in the United States and certain other jurisdictions.
Contents Preface Introduction 9 Terminology 9 Conventions 9 Related Publications Chapter 1 Chapter 2 Introduction Introduction 11 Diagnostics: A Brief Historical Perspective 12 Overview of the ExtremeWare Diagnostics Suite 12 Supported Hardware 13 Applicable ExtremeWare Versions 13 “i” Series Switch Hardware Architecture Diagnostics Support 15 The BlackDiamond Systems BlackDiamond 6800 Series Hardware Architecture Differences The BlackDiamond Backplane BlackDiamond I/O Modules Manageme
Contents Definition of Terms 26 Standard Ethernet Detection for Packet Errors on the Wire 27 Extreme Networks’ Complementary Detection of Packet Errors Between Wires Hardware System Detection Mechanisms Software System Detection Mechanisms 27 28 29 Failure Modes Transient Failures Systematic Failures 30 30 30 Soft-State Failures Permanent Failures Responding to Reported Failures 30 31 31 Health Check Messages 33 Alert Messages Checksum Error Messages: Corrective Behavior Messages Chapter 4 33
Contents The Role of Processes to Monitor System Operation Power On Self Test (POST) Related Commands Configuring the Boot-Up Diagnostics Runtime (On-Demand) System Diagnostics Runtime Diagnostics on “i” Series Systems Related Commands Running the Diagnostics on BlackDiamond Systems Runtime Diagnostics on “i” Series Alpine and Summit Systems System Impact of Running the Diagnostics on “i” Series Switches Runtime Diagnostics on “e” Series Systems Related Commands Running the Diagnostics on Summit “e” Swit
Contents System Impacts of the Transceiver Diagnostics Network Impact of the Transceiver Diagnostics Viewing Diagnostics Results Example Log Messages for Transceiver Diagnostic Failures Examples, show diagnostics Command Example—show switch Command Transceiver Diagnostic Result Analysis FDB Scan Usage Guidelines Related Commands 84 85 86 87 88 88 89 Enabling FDB Scanning Disabling FDB Scanning Configuring the FDB Scan Diagnostics 89 89 90 System Impact of the FDB Scan Diagnostic Network Impact of the
Contents Asia TAC EMEA TAC Japan TAC Appendix A Appendix B 104 104 104 What Information Should You Collect? 105 Analyzing Data 105 Diagnostic Troubleshooting 106 Extreme Networks’ Recommendations 107 Using Memory Scanning to Screen I/O Modules 109 Limited Operation Mode and Minimal Operation Mode Limited Operation Mode Triggering Limited Operation Mode Bringing a Switch Out of Limited Operation Mode 111 112 112 Minimal Operation Mode Triggering Minimal Operation Mode Bringing a Switch Out o
Contents 8 Advanced System Diagnostics and Troubleshooting Guide
Preface This Preface provides an overview of this guide, describes guide conventions, and lists other publications that might be useful. Introduction This guide describes how to use the ExtremeWare hardware diagnostics suite to test and validate the operating integrity of Extreme Networks switches. The tools in the diagnostic suite are used to detect, isolate, and treat faults in a system. This guide is intended for use by network designers, planners, and operations staff.
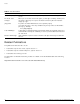
Preface Table 2: Text Conventions Convention Description Screen displays This typeface indicates command syntax, or represents information as it appears on the screen. The words “enter” and “type” When you see the word “enter” in this guide, you must type something, and then press the Return or Enter key. Do not press the Return or Enter key when an instruction simply says “type.” [Key] names Key names are written with brackets, such as [Return] or [Esc].
1 Introduction This guide describes how to use the ExtremeWare hardware diagnostics suite to test and validate the operating integrity of Extreme Networks switches. The tools in the diagnostic suite are used to detect, isolate, and treat faults in a system.
Introduction Diagnostics: A Brief Historical Perspective Diagnostic utility programs were created to aid in troubleshooting system problems by detecting and reporting faults so that operators or administrators could go fix the problem. While this approach does help, it has some key limitations: • It is, at its base, reactive, meaning a failure must occur before the diagnostic test can be used to look for a cause for the failure.
Supported Hardware • On-demand system hardware diagnostics—Run on demand through user CLI commands; runs in either of two modes: normal (faster-running basic test sequence) or extended (more thorough, but longer-running test sequence). The extended diagnostics include the packet memory scan, which checks the packet memory area of the switch fabric for defects and maps out defective blocks.
Introduction 14 Advanced System Diagnostics and Troubleshooting Guide
2 “i” Series Switch Hardware Architecture This chapter provides a brief summary of the “i” series switch hardware features most relevant to understanding the use of the Extreme Networks diagnostic suite.
“i” Series Switch Hardware Architecture The BlackDiamond Systems In the context of the advanced system diagnostics suite, the BlackDiamond family of core chassis switches share the same fundamental hardware architecture: a multislot modular chassis containing a passive backplane that supports redundant load-sharing, hot-swappable switch fabric modules. On BlackDiamond systems, each I/O module and MSM represents an individual switch containing its own switching fabric and packet memory.
The BlackDiamond Systems The BlackDiamond Backplane The BlackDiamond backplane is a passive backplane, meaning that all the active components such as CPUs, ASICs, and memory have been moved onto plug-in modules, such as the I/O modules and MSMs.
“i” Series Switch Hardware Architecture BlackDiamond I/O Modules Each BlackDiamond I/O module has a built-in switching fabric (see Figure 3) giving the module the capability to switch local traffic on the same module. Traffic that is destined for other modules in the chassis travels across the backplane to the MSMs, where it is switched and sent to its destination I/O module.
The BlackDiamond Systems packet memory for temporary storage. Based on the information in memory, such as the FDB, the address filtering and queue management ASIC makes a forwarding decision. If the next hop is a local port (on the same module), the packet is forwarded to the external MAC and PHY for the exit port. If the packet is destined for another module (as either slow path traffic or fast path traffic), the packet is transferred to the internal MAC and then on to the MSM (CPU).
“i” Series Switch Hardware Architecture BlackDiamond MSM Redundancy The CPU subsystems on a pair of BlackDiamond MSMs operate in a master-slave relationship. (See Figure 5.
The BlackDiamond Systems The MSM failover behavior depends on the following factors: • Platform type and equippage (Summit vs. Alpine vs. BlackDiamond) • Software configuration settings for the software exception handling options such as system watchdog, system recovery level, and reboot loop protection. (For more information on the configuration settings, see Chapter 4, “Software Exception Handling.”) In normal operation, the master MSM continuously resets the watchdog timer.
“i” Series Switch Hardware Architecture Alpine Systems Like the BlackDiamond systems, the Alpine systems are also based on a multislot modular chassis that uses the inferno chipset, but the Alpine switches differ from the BlackDiamond switches on these points (see Figure 6): • Active backplane—Alpine switches use an active backplane that uses the same basic set of ASICs (the switch engine ASIC and the address filtering and queue management ASIC) and memory (packet memory for storing packets; OTP RAM, PQ RA
Summit “i” Series Systems Summit “i” Series Systems Unlike the BlackDiamond and Alpine systems, the Summit “i” series stackables are not modular systems: all of the system components are integrated into one unit. (See Figure 7.
“i” Series Switch Hardware Architecture 24 Advanced System Diagnostics and Troubleshooting Guide
3 Packet Errors and Packet Error Detection This chapter describes some of the factors that might result in packet errors in the switch fabric and the kinds of protection mechanisms that are applied to ensure that packet error events are minimized and handled appropriately.
Packet Errors and Packet Error Detection Definition of Terms To establish a basis for the descriptions in this chapter, Table 3 lists and defines terms that are used repeatedly throughout this chapter and those that follow. When any of these terms are used for their precise meaning, they are shown emphasized in bold type.
Standard Ethernet Detection for Packet Errors on the Wire Table 3: Data Error Terms (continued) Term Description Fast path This term refers to the data path for a packet that traverses a switch and does not require processing by the CPU. Fast path packets are handled entirely by ASICs and are forwarded at wire rate.
Packet Errors and Packet Error Detection Figure 8: Generalized switch block diagram 4 5 3 ASIC CPU sub-system ASIC DMAC 6 2 1 MAC MAC CG_002B 1 PHY port and MAC device layer 4 Control bus 2 Packet bus (PBUS) 5 Packet memory 3 Forwarding ASICs 6 CPU subsystem The following sections describe the hardware and software components that work together to detect and manage packet error incidents within the Extreme Networks switch.
Extreme Networks’ Complementary Detection of Packet Errors Between Wires transmitted, but an invalid CRC value is included with the packet. Therefore, the receiving device will detect an invalid CRC value and will drop the packet. In Summit “i” series stackable switches, the packet checksum is calculated by the MAC ASIC on the receiving port and is compared against the verification checksum calculated by the MAC ASIC on the transmitting port, as described above.
Packet Errors and Packet Error Detection described in the section “System (CPU and Backplane) Health Check” on page 70. For example, the system health check facility can be configured such that ExtremeWare will insert a message into the system log that a checksum error has been detected. Failure Modes Although packet errors are extremely rare events, packet errors can occur anywhere along the data path, along the control path, or while stored in packet memory.
Failure Modes Failures of this type are the result of software or hardware systems entering an abnormal operating state in which normal switch operation might, or might not, be impaired. Permanent Failures The most detrimental set of conditions that result in packet error events are those that result in permanent errors. These types of errors arise from some failure within the switch fabric that causes data to be corrupted in a systematic fashion.
Packet Errors and Packet Error Detection The slow-path and fast-path categories each have a separate configured threshold and associated action that occurs at the end of the 20-second window: • For the slow-path category, the three types of slow-path subcategory reports are tallied and compared to the configured slow-path subcategory threshold. • For the fast-path category, the two types of fast-path subcategory reports are tallied and compared to the configured fast-path subcategory threshold.
Health Check Messages The following examples describe how these values apply to a BlackDiamond 6808: • On a BlackDiamond 6808, if more than six fast-path errors are detected within one 20-second window, a message is inserted into the system log. If this pattern recurs three times within three windows, the system health check subsystem takes the action specified in the configure sys-health-check command.
Packet Errors and Packet Error Detection The intent of these messages is to alert the NOC that the health check error threshold is being exceeded. Closer monitoring is required, but these errors do not necessarily point to a systematic problem. These messages take the general format: date time Sys-health-check type checksum error cat data Example: Sys-health-check [EXT] checksum error (fast path) on slot 2,prev=73 cur=82 where: level The severity level, either CRIT or WARN.
Health Check Messages These messages appear in the log when EDP packets received are corrupted: • Sys-health-check [EDP] checksum error (slow-path) on M-BRD, port 0x03 701026-00-03 0003Y-00052 — (Summit) • Sys-health-check [EDP] checksum error (slow-path) on BPLNE, port 0x03 701026-00-03 0003Y-00052 — (Alpine) • Sys-health-check [EDP] checksum error (slow-path) on MSM-A, port 0x03 701026-00-03 0003Y-00052 — (BlackDiamond) These messages appear in the log when the hardwar
Packet Errors and Packet Error Detection error • Backplane link—Indicates that health check packets were lost on one or more backplane links connecting an MSM module to an I/O module. Either module might be in error; check the transceiver diagnostics. • FDB error—Indicates that a discrepancy was detected during the FDB scan of the RAM memory pool. The error condition that summarizes the failure.
4 Software Exception Handling This chapter describes the software exception handling features built into Extreme hardware and software products to detect and respond to problems to maximize switch reliability and availability.
Software Exception Handling The system-watchdog feature is enabled by default. The CLI commands related to system-watchdog operation are: enable system-watchdog disable system-watchdog NOTE During the reboot cycle, network redundancy protocols will work to recover the network. The impact on the network depends on the network topology and configuration (for example, OSPF ECMP versus a large STP network on a single domain).
Overview of Software Exception Handling Features switch is equipped with MSM-64i modules), or 2) initiate a hitless failover (when the switch is equipped with MSM-3 modules). The watchdog is a software watchdog timer that can be enabled or disabled through CLI commands.
Software Exception Handling Configuring System Recovery Actions ExtremeWare provides a user-configurable system recovery software diagnostic tool whose main function is to monitor the system boot processes. If an error occurs during the POST, the system enters a fail-safe mode that allows the network or system administrator to view logs and troubleshoot the fault. The system recovery behavior can also be configured to ensure that no software exception errors occur during normal runtime operation.
Configuring System Recovery Actions Configuring System Recovery Actions on “e” Series Switches To specify a system recovery scheme for “e” series switches when a software exception occurs, use this command: configure sys-recovery-level [none | [all | critical]] [reboot] where: none No recovery action is taken when a software exception occurs (no system shutdown or reboot, etc.). This is the default action.
Software Exception Handling back into the network during a scheduled outage window. This might be an advantage if all connected nodes are dual-homed, as a reinsertion will trigger a network reconvergence and an additional service outage. NOTE Under the reboot or shutdown options, network redundancy protocols will work to recover the network. The only difference between these two options, in this case, is that under the reboot option the reinsertion of the system triggers a second network convergence.
Configuring Reboot Loop Protection Configuring Reboot Loop Protection Reboot loop protection prevents a failure that persists across a reboot from putting the switch into an endless cycle of reboots. Reboot loop protection is helpful to increase network stability in the event that some systematic problem is causing the watchdog timer to expire or a software exception to be triggered repeatedly. You can configure a reboot threshold and a history timer.
Software Exception Handling On BlackDiamond switches you can configure the number of times the slave MSM can reboot within a configured time limit or configure the slave MSM to use the global reboot-loop-protection configuration.
Dumping the “i” Series Switch System Memory Dumping the “i” Series Switch System Memory On “i” series switches, you can dump (copy and transfer) the contents of the system DRAM memory to a remote TFTP host so that it can be passed to an Extreme Networks technical support representative who will examine and interpret the dump results. The system dump only works through the Ethernet management port.
Software Exception Handling • Configure the system dump as a system recovery response action.
Dumping the “i” Series Switch System Memory Example Log for a Software Exception The following log is taken after simulating a BGTask crash. The System recovery level, for critical events, is set to system shutdown. Hence, when BGTask crashed, all I/O modules in the system was shutdown. 12/23/2000 23:15:14.87 Set card 9 to Non-operational 12/23/2000 23:15:14.85 Card in slot 9 is off line 12/23/2000 23:15:13.75 Set card 8 to Non-operational 12/23/2000 23:15:13.
Software Exception Handling 48 Advanced System Diagnostics and Troubleshooting Guide
5 Diagnostics This chapter describes how to configure and use the Extreme Advanced System Diagnostics.
Diagnostics Some diagnostic tests, such as the slot-based hardware diagnostics (including the packet memory scan), for example, can be run on demand through user CLI commands. Other tests can be run on demand by user CLI commands and can also be configured to observe specific user-selected settings.
Diagnostic Test Functionality Diagnostic tests are processed by the CPU. When invoked, each diagnostic tests looks for different things (device problems, communication-path problems, etc.), and uses either the control bus or the data bus, or—in some cases—both buses to perform the test. For example, Figure 9 shows a simplified example of the CPU health check test. The CPU health check test sends five different diagnostic packets across the control bus to each I/O module.
Diagnostics Figure 10: Backplane health check paths (BlackDiamond architecture) Control Bus Control Bus CPLD UART MAC To Backplane FLASH PQM PBus SRAM To Backplane MAC SE ASIC (Twister) MGMT Master MSM Daughter Card CPU loads test packet to MSM Fabric.
System Health Checks: A Diagnostics Suite — Offer configurable levels — Remove the switch fabric from service for the duration of the tests • Background packet memory scanning and mapping — Checks all packet storage memory for defects — Potentially maps out defective blocks • Backplane and CPU health checks — Checks end-to-end integrity on communication paths between the CPU and all I/O modules — Takes automatic action when errors are detected • Upper layer protocol validation — Extreme Discovery Protocol
Diagnostics scanning and memory mapping diagnostics are used to identify and correct switch fabric checksum errors. Memory scanning and memory mapping are two separate functions: scanning detects the faulted portion of the memory; mapping re-maps the memory to remove the faulted memory section. Memory scanning is designed to help isolate one of the major root causes of fabric checksum errors: single-bit permanent (hard) failures.
System Health Checks: A Diagnostics Suite Automatic Mode. Automatic mode for initiating a memory scan is set up when the system health check auto-recovery option is enabled (see “System (CPU and Backplane) Health Check” on page 70). When system health checks fail at the specified frequency, packet memory is invoked automatically. Automatic mode status is listed in the “sys-health-check” field of the display for the show switch command.
Diagnostics Power On Self Test (POST) The POST actually consists of two test processes: a “pre-POST” portion that runs before the POST, and the POST itself. The entire POST (both portions) runs every time the system is booted. It tests hardware components and verifies basic system integrity. The POST can be configured to run in normal or extended mode. The default is normal mode because it consumes less time.
Runtime (On-Demand) System Diagnostics Runtime (On-Demand) System Diagnostics The ExtremeWare diagnostics test suite offers a set of one-time test routines that can be run on demand by user command. Depending on the switch platform and model—differences in hardware architecture determine what aspects of the diagnostic tests apply, these tests are activated by different commands and different user-configurable options.
Diagnostics BlackDiamond systems—whether the module type being tested is an MSM or an I/O module), but adds the following two test sets: — Packet memory test (where possible, this test also attempts to remap up to eight errors) — Additional loop-back tests: Big packet (4k) MAC, transceiver, VLAN • On Demand Packet Memory Scan—The packet memory test scans the switch fabric in the switch (Summit or Alpine) or the module in the specified slot (BlackDiamond only) for single-bit packet memory defects.
Runtime (On-Demand) System Diagnostics System Impact of Running the Diagnostics on “i” Series Switches These diagnostics are invasive diagnostics. The diagnostics perform different tests, depending on whether the test is being performed on the CPU subsystem or an individual I/O module. The diagnostics reset and erase all current hardware states.
Diagnostics NOTE Only run these diagnostics when the switch can be brought off-line. The tests performed are extensive and affect traffic that must be processed by the system CPU, because the diagnostics themselves are processed by the system CPU. Related Commands run diagnostics show diagnostics Running the Diagnostics on Summit “e” Switches To run the diagnostics on a Summit “e” system, use this command: run diagnostics [extended | normal | stack-port] where: extended (All Summit “e” switches.
Automatic Packet Memory Scan (via sys-health-check) Automatic mode status is listed in the “sys-health-check” field of the display for the show switch command. When auto-recovery is configured, an automated background polling task checks every 20 seconds to determine whether any fabric checksums have occurred. Three consecutive samples must be corrupted for any module to invoke autoscan.
Diagnostics Table 6: Auto-recovery memory scanning and memory mapping behavior (continued) Platform New Online Offline Errors Mode Mode Detected BlackDiamond with two MSM64i modules; error on master • • • BlackDiamond with two MSM64i modules; error on slave • • • BlackDiamond with two MSM64i modules; errors on both • • • BlackDiamond 6816 MSM64i modules in slots C and D • • • Alpine and BlackDiamond “i” series I/O modules Behavior • • • 0 1-7 >7 0 1-7 >7 MSM64i kept online.
Automatic Packet Memory Scan (via sys-health-check) Table 7: Manual diagnostics memory scanning and memory mapping behavior, normal (continued) Platform Summit “i” series New Online Offline Errors Mode Mode Detected • • • BlackDiamond with one MSM64i (or slave MSM64i is offline) • • • BlackDiamond with two MSM64i modules; error on master • • • BlackDiamond with two MSM64i modules; error on slave • • • BlackDiamond 6816 MSM64i modules in slots C and D • • • Alpine and BlackDiamond “i” series I/O
Diagnostics Table 8: Manual diagnostics memory scanning and memory mapping behavior, extended (continued) Platform Errors Detected? Behavior BlackDiamond with one MSM64i (or slave MSM64i is offline) Yes No Switch enters limited commands mode. Switch kept online. BlackDiamond with two MSM64i modules; errors on master Yes No Master MSM64i fails over. MSM64i kept online. BlackDiamond with two MSM64i modules; errors on slave Yes No MSM64i taken offline. MSM64i kept online.
Automatic Packet Memory Scan (via sys-health-check) During the memory scan, the CPU utilization is high and mostly dedicated to executing the diagnostics—as is normal for running any diagnostic on the modules. During this time, other network activities where this system is expected to be a timely participant could be adversely affected, for example, in networks making use of STP and OSPF.
Diagnostics Interpreting Memory Scanning Results If single-bit permanent errors are detected on an “i” series switch during the memory scanning process, these errors will be mapped out of the general memory map with only a minimal loss to the total available memory on the system.
Per-Slot Packet Memory Scan on BlackDiamond Switches Per-Slot Packet Memory Scan on BlackDiamond Switches While the system health check auto-recovery mode is effective at recovering from suspected failures, it does not provide the depth of control over recovery options that many network administrators require.
Diagnostics To disable packet memory scanning on a BlackDiamond module and return to the behavior configured for the global system health check facility, use this command: unconfigure packet-mem-scan-recovery-mode slot [msm-a | msm-b | ] To view the recovery mode configuration for BlackDiamond slots that have per-slot packet memory scanning enabled, use this command: show packet-mem-scan-recovery-mode which displays the following information: • Global settings for the system health check fac
Per-Slot Packet Memory Scan on BlackDiamond Switches modules will trigger a reboot if the failed module is the master MSM. A failed MSM-64i in the slave slot is simply removed from service. In general, network redundancy protocols will work to recover the network. The impact on the network depends on the network topology and configuration (for example, OSPF ECMP versus a large STP network on a single domain).
Diagnostics System (CPU and Backplane) Health Check The purpose of the system health check feature is to ensure that communication between the CPU on the management switch module (MSM) and all I/O cards within the chassis is functioning properly. NOTE The system health check feature is supported only on “i” series Summit, Alpine, and BlackDiamond switches.
System (CPU and Backplane) Health Check Related Commands enable sys-health-check disable sys-health-check configure sys-health-check alarm-level [card-down | default | log | system-down | traps] configure sys-health-check auto-recovery [offline | online] (BlackDiamond) configure sys-health-check alarm-level auto-recovery [offline | online] (Alpine or Summit) Health Check Functionality The system health check feature can be configured to operate in one of two mutually-exclusive modes: • a
Diagnostics where: number of tries Specifies the number of times that the health checker attempts to auto-recover a faulty module. The range is from 0 to 255 times. The default is 3 times. offline Specifies that a faulty module is to be taken offline and kept offline if one of the following conditions is true: online • More than eight defects are detected. • No new defects were found by the memory scanning and mapping process.
System (CPU and Backplane) Health Check NOTE Frequent corrupted packets indicate a failure that you need to address immediately. Missed packets are also a problem, but you should consider the total number of missed packets as only a general check of the health of the system. Small numbers (fewer than five) can generally be ignored, as they can be caused by conditions where the CPU becomes too busy to receive the transmitted packets properly, subsequently causing the missed packet count to increase.
Diagnostics Backplane Health Check Diagnostic Results—Example 1. Example 1 shows the report from one MSM, MSM-A in a BlackDiamond 6808 switch. If two MSMs are in the chassis, both MSM-A and MSM-B are reported.
System (CPU and Backplane) Health Check To clarify the relationship between MSM ports, the backplane links, and the I/O module slots shown in Example 1, consider the following annotated adaptation of the example’s output (not actual command output; for instructional purposes only): MSM Port ------Port 1: Port 2: Port 3: Port 4: Port 5: Port 6: Port 7: Port 8: Port 9: Port 10: Port 11: Port 12: Port 13: Port 14: Port 15: Port 16: Port 17: Port 18: Port 19: Port 20: Port 21: Port 22: Port 23: Port 24: Port 2
Diagnostics Backplane Health Check Diagnostic Results—Example 2. Example 2 shows a report for MSM-A again, but this time with missed and corrupted packets on different channels going to more than one I/O module slot. In example 2, the missed packets and corrupted packets on channels going to more than one I/O module (slots 1, 4, and 7 in this example) indicate what is most likely a problem with MSM-A, itself.
System (CPU and Backplane) Health Check Backplane Health Check Diagnostic Results—Example 3. Example 3 shows a report for MSM-A again, but with missed and corrupted packets on channels going to the same slot. In example 3, the corrupted packets on channels going to the same I/O module (slot 7 in this example) indicate what is most likely a problem with the I/O module in slot 7.
Diagnostics Backplane Health Check Diagnostic Results—Example 4. Example 4 shows a report for MSM-A again, but with small numbers of missed packets on channels going to different slots. In example 4, the small numbers of missed packets (fewer than five) indicate what is most likely not a serious hardware problem. Either the CPU was too busy during that period and missed a round of tests, or the hardware experienced an intermittent error.
System (CPU and Backplane) Health Check • If a health check checksum error message appears in the log, and the output of the show diagnostics command shows excessive backplane health check error counts, you can usually use those two sources of information to determine the location of the problem. • If backplane health check counts for missing or corrupted packets are increasing, but the log shows no checksum error messages, the problem is probably a low-risk, transient problem—possibly a busy CPU.
Diagnostics NOTE Be aware that the slot information in the log message might be symptomatic of a problem occurring on another module in the system rather than on the indicated module. When you have observed log messages indicating missed or corrupted health check packets, use the show diagnostics command as the next source of information about health check failures.
System (CPU and Backplane) Health Check • CPU health check failures might indicate a faulty transceiver on one of the MSMs, but might also indicate other I/O control bus failures. Always use log messages in conjunction with the output of the show diagnostics command.
Diagnostics Transceiver Diagnostics The transceiver diagnostics test the integrity of the management bus transceivers used for communication between the ASICs in the Inferno chipset and the CPU subsystem. (See Figure 10.) These diagnostics write test patterns to specific ASIC registers, read the registers, then compare results, looking for errors in the communication path. NOTE The transceiver diagnostics are intended for modular “i” series switches only.
Transceiver Diagnostics To configure the transceiver diagnostic threshold and window values, use these commands: • To configure the number of 20-second periods (windows) within which the configured number of errors can occur, use this command: configure transceiver-test window <1-8> where window specifies the number of 20-second periods (windows) within which the configured number of errors can occur. The window value is a number in the range from 1 to 8.
Diagnostics Viewing Diagnostics Results Use the following commands to view information related to the transceiver diagnostic test: show log show diagnostics show switch Example Log Messages for Transceiver Diagnostic Failures • If the transceiver diagnostic test detects a failure, any of the following messages will appear in the log one time.
Transceiver Diagnostics • CARD_HWFAIL_RR_SCNTRL_REG_TIMEOUT • CARD_HWFAIL_BLIZZARD_REGOP_TIMEOUT • CARD_HWFAIL_BLIZZARD_SER_MGMT_REG_TIMEOUT • CARD_HWFAIL_BLIZZARD_STAT_CTRL_REG_TIMEOUT • CARD_HWFAIL_TSUNAMI_REGOP_TIMEOUT • CARD_HWFAIL_TSUNAMI_SER_MGMT_REG_TIMEOUT • CARD_HWFAIL_TSUNAMI_STAT_CTRL_REG_TIMEOUT • CARD_HWFAIL_BLADE_STATUS_REG_TIMEOUT • CARD_HWFAIL_BLADE_CONTROL_REG_TIMEOUT • CARD_HWFAIL_VLAN_LKUP_REG_TIMEOUT • CARD_HWFAIL_DIAG_FAILED • CARD_HWFAIL_DIAG_PMS_FAILED • CARD
Diagnostics Example—show diagnostics command (Alpine system). The following example of the show diagnostics command displays the results of the transceiver diagnostics for an Alpine system.
Transceiver Diagnostics License: ... SysHealth Check: Recovery Mode: Transceiver Diag: Fdb-Scan Diag: System Watchdog: ... Full L3 + Security Enabled. None Enabled. Enabled. Enabled. Alarm Level = Log Failure action: sys-health-check Failure action: sys-health-check Transceiver Diagnostic Result Analysis • If transceiver test error counters are incrementing, but there is no associated log message, the problem is probably a transient problem. You should continue to monitor the counter.
Diagnostics FDB Scan The FDB scan diagnostic test addresses the possibility of hardware FDB memory issues where FDB hardware table entries do not match what was written to them by software. The test is a non-invasive test that scans the entire FDB RAM memory pool on all switch fabrics, compares existing software table entries against what is in the hardware table, and reports or otherwise acts on any discrepancies it detects.
FDB Scan The failure action that the FDB scan test performs depends on the sys-health-check command configuration. The command configurations options available under the system health check are described in “Health Check Functionality” on page 71.
Diagnostics Configuring the FDB Scan Diagnostics • To set the interval between FDB scans, use the following command: configure fdb-scan period <1-60> The interval is a number in the range from 1 to 60 seconds. The default is 30 seconds. We recommend a period of at least 15 seconds. If you attempt to configure a period of fewer than 15 seconds, the system displays the following warning message: Setting period below (15) may starve other tasks.
FDB Scan Viewing Diagnostics Results Use the following commands to view information related to the FDB Scan diagnostic test: show log show diagnostics show fdb remap clear fdb remap show switch Example Log Messages for FDB Scan Diagnostic Failures Look for the following types of messages in the log: FDB Scan: max number of remaps (num) exceeded. Calling sys-health-check. slot entry This message indicates that the FDB scan cannot re-map any more FDB entries.
Diagnostics In the example output of the show diagnostics command, in those slots equipped with a module, a non-zero value in the “NumFail” column indicates that a problem has been detected with FDB memory. During the FDB scan, the test attempts to map an error location so that it will not be used.
6 Additional Diagnostics Tools This chapter describes additional diagnostic tools to detect and help resolve system problems. This chapter contains the following sections: • Temperature Logging for Modular Switches on page 93 • Syslog Servers on page 94 • Cable Diagnostics on page 96 Temperature Logging for Modular Switches One of the leading causes of early failure in all electrical equipment is excessive heat.
Additional Diagnostics Tools System Impacts of Temperature Logging The temperature logging feature does not impact the performance of the system, but temperature logging causes one log entry during every hour of switch operation. To prevent the loss of important log messages, Extreme Networks recommends the use of an external syslog server. For more information about the use of an external syslog server, refer to “Syslog Servers” on page 94.
Syslog Servers Disabling Logging to Remote Syslog Server Targets To disable logging to all remote syslog server targets, use this command: disable syslog NOTE This command disables logging to all remote syslog server targets, not to the switch targets. This setting is saved in FLASH and will be in effect upon boot up. Adding a Syslog Server A total of four syslog servers can be configured at one time.
Additional Diagnostics Tools Network Impact of the Syslog Server Facility Network impact depends on the volume of log messages sent to the syslog server. But even under extreme conditions, the relative brevity of log messages means that even a very large message volume should not adversely affect network throughput.
Cable Diagnostics Running Cable Diagnostics You can run the CDM tests manually at any time, or you can schedule them to be run automatically. Running CDM tests Manually. To run the tests manually, use this command: run diagnostics cable port [ | all] This command initiates the CDM to obtain cable diagnostics values for the specified physical ports of the system. NOTE Running the cable diagnostics takes the link down, disrupting any network traffic on the specified port and its link.
Additional Diagnostics Tools The disable diagnostics cable command also purges the cable diagnostics values for the selected ports from the CDM data structures.
Cable Diagnostics Following is sample detailed diagnostic output from this command: ======================================================== Manual Diagnostics Collected @ Thu Jan 29 02:48:29 2004 ======================================================== Port Speed Avg Len Pair Fault Loc Skew Polarity Cable Pair-Swap Diagnostic (Mbps) (meters) (meters) (ns) Status Chan-AB Chan-CD Mode ---------------------------------------------------------------------------------------------6:1 1000 10 1-2 No Fault 8 ns U
Additional Diagnostics Tools length. For example, a 2% error in the default value of the speed of wave propagation results in a two-meter error for a 100-meter cable. Cable Pair Information. Twisted pair conductors in the RJ-45 Ethernet cable are connected to pins of the PHY in the following pairings: 1-2, 3-6, 4-5, and 7-8.
Cable Diagnostics Extended Cable Status Information (Gigabit link established). When the Gigabit link can be established, the CDM tests report additional status information on approximate cable length, pair skew, polarity swap, and pair swap. • Cable length—After link, the cable diagnostics use a non-TDR method to determine and report the approximate cable length between the near-end port and its far-end link partner.
Additional Diagnostics Tools 102 Advanced System Diagnostics and Troubleshooting Guide
7 Troubleshooting Guidelines When a problem arises in the network, you should gather consistent information and deliver that information to Extreme Networks for ongoing historical issue tracking and trend analysis. This chapter describes the kinds of information you should collect and the general analytical processes you should follow.
Troubleshooting Guidelines Asia TAC Asia Pacific Rim, except Japan Located in Santa Clara, CA USA Toll free telephone: 1-800-998-2408 Direct telephone: 408-579-2826 E-mail: support@extremenetworks.com Web site: http://www.extremenetworks.com/support/techsupport.asp/ Office hours: Monday–Sunday, 3 P.M.–12 A.M., Pacific Standard Time EMEA TAC Located in Utrecht, Netherlands Direct telephone: +31-30-800-5000 E-mail: support@extremenetworks.com Web site: http://www.extremenetworks.com/support/techsupport.
What Information Should You Collect? What Information Should You Collect? • Mandatory technical information: — Before reboot, use the show tech CLI command to collect system information.
Troubleshooting Guidelines Diagnostic Troubleshooting For “i” series switches, observe the following troubleshooting guidelines: • If there are no checksum errors appearing in the system log, but the health check counts for missing or corrupted packets are increasing, it is probably a transient problem, of low risk (possibly a busy CPU).
Extreme Networks’ Recommendations Extreme Networks’ Recommendations Extreme Networks strongly recommends that you observe the process shown in Figure 11 and outlined in the steps that follow when dealing with checksum errors. Figure 11: Diagnostic Troubleshooting Process Customer experiences checksum errors on Inferno/Triumph products. Customer responsibility Are these hard errors? No Monitor closely. No action needed. Yes Is Extremeware Software version 6.2.
Troubleshooting Guidelines 2 Did the problem go away? If it did, monitor the operation of the switch, but no immediate action is required. If it did not disappear, it is probably a permanent hard error, is service-affecting, and must be dealt with immediately by running the ExtremeWare extended diagnostics (including the packet memory scan). 3 Because the extended diagnostics require down time, schedule an appropriate maintenance window to minimize the impact on the rest of the network.
Using Memory Scanning to Screen I/O Modules Using Memory Scanning to Screen I/O Modules NOTE Memory scanning is available in ExtremeWare 6.2.2 and later releases, and applies only to “i” series Summit, Alpine, and BlackDiamond switches. To check modules supported by the memory scanning feature, you can screen existing or new modules without having to upgrade or certify new ExtremeWare software on your networks.
Troubleshooting Guidelines 110 Advanced System Diagnostics and Troubleshooting Guide
A Limited Operation Mode and Minimal Operation Mode This appendix describes two switch operational modes wherein switch behavior is restricted to protect the stability of the switch and network and to allow troubleshooting or corrective action. The two switch operational modes are limited operation mode and minimal operation mode. They result from different failure conditions, but respond to similar procedures for troubleshooting and correcting their respective failure conditions.
Limited Operation Mode and Minimal Operation Mode Triggering Limited Operation Mode On a BlackDiamond system with a single MSM, if a diagnostics test detects errors or if the POST fails, the system goes into limited operation mode. Similarly, on a Summit or Alpine system, if a diagnostics test detects errors, the Summit or Alpine switch will go into limited operation mode. When a failure occurs, the system retains an error code.
Minimal Operation Mode To detect a reboot loop, a timestamp and a counter are saved. Each time the switch reboots because of a software crash or exception, the counter is incremented. A user-executed reboot command clears the timestamp and counter to prevent a false reboot loop protection. This action also allows the user to bring the switch out of minimal operation mode so that the system can come up normally after the failure has been identified and fixed.
Limited Operation Mode and Minimal Operation Mode 114 Advanced System Diagnostics and Troubleshooting Guide
B Reference Documents This appendix lists additional documentation and other information resources that support the use of the ExtremeWare advanced system diagnostics suite in testing and validating the operating integrity of Extreme Networks switches.
Reference Documents • White papers and solutions documentation: — Advanced technologies — Applications in the networking world • Additional troubleshooting tools: — ExtremeWare Release Notes Use the release notes to check for known issues, supported limits, bug fixes from higher ExtremeWare versions, etc. (Release notes are available to all customers who have a service contract with Extreme Networks via eSupport. The release notes are provided by product, under the Software Downloads area of eSupport.
Index Symbols "e" series "hitless" MSM failover "i" series "inferno" series 13, 59, 101 21, 39 13 13 A active backplane (Alpine systems) active tests Alpine hardware architecture Alpine systems active backplane I/O module architecture SMMi processor module ASICs automatic system dump 22 50 22 22 22 22 28 45 B backplane active passive backplane health check (BlackDiamond only) BlackDiamond backplane hardware architecture I/O modules MSM MSM-3 redundancy 22 17 70 17 16 18 21, 39 20 Advanced System Diag
Index defined error detection mechanisms fast-path checksum error fast path checksum errors defined forwarding FastPOST FDB background scan process scan diagnostic field notices forwarding ASICs 27 28 29 29 27 29 49 25 88 116 28 H hardware architecture Alpine BlackDiamond Summit 22 16 23 I INT invasive diagnostics 64, 111 M MAC device layer maintenance mode management bus. See slow path Management Switch Fabric Module. See MSM manual system dump mean time to repair.
Index tBGTask tConsole tEdpTask tEsrpTask tExcTask tExtTask tLogTask tNetTask tShell tSwFault tSyslogTask systematic errors 40, 41 41 40, 41 40, 41 41 41 41 40, 41 41 41 41 30 T tasks root task tBGTask tConsole tEdpTask tEsrpTask tExcTask tExtTask tLogTask tNetTask tShell tSwFault tSyslogTask tBGTask tConsole tEdpTask tEsrpTask test packet type, system health check tExcTask tExtTask tLogTask tNetTask transceiver diagnostics background check configuration and use transient errors troubleshooting cables Et
Index 120 Advanced System Diagnostics and Troubleshooting Guide
Index of Commands A abort diagnostics cable 96, 97 C clear fdb remap 91 clear log 93 clear log diag-status 112, 113 configure diagnostics 56 configure diagnostics cable 96 configure diagnostics cable time 97 configure fdb-scan failure-action 89, 90 configure fdb-scan period 89, 90 configure log target filter 95 configure packet-mem-scan-recovery-mode 55, 67 configure reboot-loop-protection threshold 43, 112 configure reboot-loop-protection threshold backup-msm 44 configure reboot-loop-protection threshol
Index of Commands show fdb remap 91, 106 show log 72, 84, 91, 93, 105, 112, 113 show packet-mem-scan-recovery-mode 67 show port rxerrors 27 show ports cable diagnostics 101 show switch 43, 56, 84, 91, 105 show system-dump 46 show tech 105, 112, 113 show version 105 synchronize 43 synchronize command 21 U unconfigure fdb-scan failure-action unconfigure fdb-scan period unconfigure packet-mem-scan-recovery-mode unconfigure switch all unconfigure system-dump upload system-dump 122 89 89 67 56 46 46 Advance