Extreme Management Center®, ExtremeControl®, and ExtremeAnalytics® Virtual Engine Installation Guide 12/2019 9036587-00 Subject to Change Without Notice
Copyright © 2019 Extreme Networks, Inc. All Rights Reserved. Legal Notices Extreme Networks, Inc., on behalf of or through its wholly-owned subsidiary, Enterasys Networks, Inc., reserves the right to make changes in specifications and other information contained in this document and its website without prior notice. The reader should in all cases consult representatives of Extreme Networks to determine whether any such changes have been made.
l l l GTAC Knowledge — Get on-demand and tested resolutions from the GTAC Knowledgebase, or create a help case if you need more guidance. The Hub — A forum for Extreme customers to connect with one another, get questions answered, share ideas and feedback, and get problems solved. This community is monitored by Extreme Networks employees, but is not intended to replace specific guidance from GTAC.
Table of Contents Table of Contents 4 Engine Deployment 7 Deploying the Virtual Engine on a VMware ESX Server 7 Deployment Requirements 7 Deploying the Virtual Engine 7 Shutting Down the Engine 13 Deploying the Virtual Engine on a Hyper-V Server 14 Deployment Requirements 14 Deploying the Virtual Engine 14 Extreme Management Center Engine Configuration 22 Pre-Configuration Tasks 22 Configuring the Extreme Management Center Engine 22 Launching Extreme Management Center Applications 3
Reinstalling Extreme Management Center Appliance Software ExtremeControl Engine Configuration 34 36 Pre-Configuration Tasks 36 Configuring the ExtremeControl Engine 36 Changing ExtremeControl Engine Settings 43 Using NAC Manager 43 Changing DNS, NTP, SSH, and SNMP Settings 43 Changing Hostname, Gateway, and Static Routes 44 Using the vSphere Client Console Tab 44 Changing the Extreme Management Center Server IP Address 45 Changing Web Service Credentials 45 Changing the Engine IP Address
Changing the Web Service Credentials 64 Upgrading ExtremeAnalytics Engine Software 64 Reinstalling ExtremeAnalytics Engine Software 65 6 of 65
Deploying the Virtual Engine on a VMware ESX Server Engine Deployment This chapter provides an overview of Extreme Management Center, ExtremeControl, and ExtremeAnalytics virtual engine deployment requirements and provides instructions for deploying a virtual engine on a VMware® and Hyper-V server. Deploying the Virtual Engine on a VMware ESX Server Deployment Requirements A virtual engine is a software image that runs on a virtual machine.
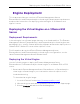
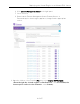
Deploying the Virtual Engine on a VMware ESX Server 4. Click Extreme Management Center in the right-panel. 5. Select a version. 6. Download the Extreme Management Center, ExtremeControl, or ExtremeAnalytics virtual engine (appliance) image from the appropriate section. 2. Open the vSphere client. From the File menu, select Deploy OVF Template. (Even though the virtual engine is distributed in .OVA file format, the menu option refers to the alternate .OVF format.
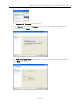
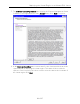
Deploying the Virtual Engine on a VMware ESX Server The Deploy OVF Template window opens. 3. In the Source panel, use the Browse button to select the engine image that you downloaded. Click Next. 4. The OVF Template Details panel displays information about the selected image file. Click Next to continue.
Deploying the Virtual Engine on a VMware ESX Server 5. The End User License Agreement panel displays the Extreme Management Center Software License Agreement. Click the Accept button. Click Next to continue. 6. In the Name and Location panel, enter a name for the virtual machine that will be created as part of deploying the virtual engine. This name will be used in the vSphere client’s inventory list. It does not have to be the same as the hostname of the virtual engine. Click Next.
Deploying the Virtual Engine on a VMware ESX Server 7. If your VMware server configuration has multiple datastores, use the Datastore panel to select the datastore where the virtual engine is hosted. Verify that there is enough free space available for the engine image. The Extreme Management Center engine requires 100 GB of hard drive space and the ExtremeControl engine requires 40 GB of hard drive space. You will need more space if you will be storing snapshots of your virtual engine. Click Next.
Deploying the Virtual Engine on a VMware ESX Server 9. The Ready to Complete panel displays a summary of your selections. Review your choices and use the Back button to return to previous screens and make any required changes. When you are ready, click the Finish button to complete the deployment. 10. Once the deployment is complete, open the vSphere client Inventory tree and select the virtual engine. In the right-panel Getting Started tab, click Power on the virtual machine.
Deploying the Virtual Engine on a VMware ESX Server A login prompt is displayed on the right-panel Console tab once the virtual machine completes its boot process, You are now ready to begin configuring the engine. Refer to the appropriate chapter for your virtual engine configuration instructions. l l l If you are configuring an Extreme Management Center virtual engine, see Extreme Management Center Engine Configuration.
Deploying the Virtual Engine on a Hyper-V Server Deploying the Virtual Engine on a Hyper-V Server Deployment Requirements A virtual engine is a software image that runs on a virtual machine. The , Extreme Management Center, ExtremeControl, and ExtremeAnalytics virtual engines are packaged in the .ZIP file format and must be deployed on a Microsoft Hyper-V server.
Deploying the Virtual Engine on a Hyper-V Server 2. Extract the virtual engine file to a local directory. 3. Open the Hyper-V Manager.
Deploying the Virtual Engine on a Hyper-V Server 4. From the Action menu, select Import Virtual Machine. The Import Virtual Machine wizard opens to the Before You Begin panel.
Deploying the Virtual Engine on a Hyper-V Server 5. Click Next. The Locate Folder panel opens. 6. Click the Browse button and navigate to the folder where you saved the engine image. 7. Click Select Folder, and then Next.
Deploying the Virtual Engine on a Hyper-V Server The Select Virtual Machine panel opens.
Deploying the Virtual Engine on a Hyper-V Server 8. Select the virtual machine you are importing, and then click Next.
Deploying the Virtual Engine on a Hyper-V Server The Choose Import Type panel opens. 9. Select the radio button that corresponds to the appropriate type for your machine. l l l Register the virtual machine in-place (use the existing unique ID)—Select this option if your virtual machine files are saved on your virtual machine in the correct location.
Deploying the Virtual Engine on a Hyper-V Server 10. Click Next. The Summary panel opens. You are now ready to begin configuring the engine. l l l If you are configuring an Extreme Management Center virtual engine, see Extreme Management Center Engine Configuration. If you are configuring an ExtremeControl virtual engine, see ExtremeControl Engine Configuration. If you are configuring on an ExtremeAnalytics virtual engine, see ExtremeAnalytics Engine Configuration.
Pre-Configuration Tasks Extreme Management Center Engine Configuration Once the Extreme Management Center virtual engine has been deployed on a VMware ESX or ESXi server, or a Hyper-V server using the instructions in Engine Deployment, you are ready to perform the initial engine configuration process described in this chapter. This chapter also includes information on how to change your engine settings following your initial configuration, and how to upgrade or reinstall the engine software.
Configuring the Extreme Management Center Engine 1. In the Console tab of the vSphere client, login as root with no password, and then press [Enter]. The following screen appears.
Configuring the Extreme Management Center Engine Note: You must set a new root password. This new root password will be used by the initial user when logging in to the Extreme Management Center applications. 3. Press [Enter] to set a new root password. Enter the new password as prompted. Enter new UNIX password: Retype new UNIX password: Password updated successfully.
Configuring the Extreme Management Center Engine Enter the IP address for [192.168.1.10]: Enter the IP netmask [255.255.255.0]: Enter the gateway address [192.168.1.1]: Enter the IP address of the name server (Optional): Enter the domain name for (Optional): Do you want to use NIS (y/n) [n]? y Enter the IP address of the NIS server: Enter the NIS domain name (Required): 6. In the Confirm Network Settings screen, you can accept the current configuration or modify the settings.
Configuring the Extreme Management Center Engine ========================================================== ====== The following information will be used to configure SNMP management of this device. The SNMP information entered here must be used to contact this device with remote management applications such as Extreme Management Center Console.
Configuring the Extreme Management Center Engine ========================================================== ====== Configure Date And Time Settings ========================================================== ====== The appliance date and time can be set manually or using an external Network Time Protocol (NTP) server. It is strongly recommended that NTP is used to configure the date and time to ensure accuracy of time values for SNMP communications and logged events.
Configuring the Extreme Management Center Engine 11. If you answered no to using an NTP server to set date and time, set the date and time in the Set Date and Time screen.
Configuring the Extreme Management Center Engine 13. In the Set Time Zone screen, type the number that corresponds to the appropriate time zone and press [Enter]. ========================================================== ====== Set Time Zone ========================================================== ====== You will now be asked to enter the time zone information for this system. Available time zones are stored in files in the /usr/share/zoneinfo directory.
Launching Extreme Management Center Applications Enter selection [0]: The Extreme Management Center application software is automatically installed. This could take a few minutes. When you see the following screen, configuration is complete.
Restoring a Database from a Windows Server to the Engine 2. Launch your Extreme Management Center applications by clicking on the names or icons of any of the listed applications. A login window opens. 3. Log in as root with the same password you defined in step 3 or as the user you specified in step 4. This is because the Extreme Management Center Server has a single pre-defined user, which is the user who performed the Extreme Management Center installation.
Changing Extreme Management Center Engine Settings 1. From the Console menu bar, select Alarm/Event > Tools > Event View Manager. 2. Click on the Syslog entry under Available Log Managers, and click the Edit button. The Log Manager Parameters window opens. 3. Change the path in the Log Directory field to /var/log/messages. 4. Change the Pattern to Red Hat LINUX Syslog Pattern. 5. Click OK. Changing Traps Location Change the Traps Log Manager to point to the new location on the engine.
Upgrading Extreme Management Center Engine Software engine settings following your initial engine configuration. Perform these steps in the vSphere client Console tab. Changing Basic Network Configuration To change basic network configuration settings such as hostname and engine IP address, enter the following command at the login prompt in the Console tab: /usr/postinstall/dnetconfig This will start the network configuration script and allow you to make the required changes.
Reinstalling Extreme Management Center Appliance Software the Extreme Management Center web page. Prior to performing an upgrade, you can create a snapshot of the engine that you can revert to in the event an upgrade fails. Refer to the vSphere client documentation for instructions on creating a snapshot. 1. On a system with an internet connection, go to the Extreme Management Center web page: http://extranet.extremenetworks.com/downloads/pages/NMS.aspx. 2. Enter your email address and password.
Reinstalling Extreme Management Center Appliance Software If you do not have an engine snapshot to restore, you must re-deploy and reconfigure the Extreme Management Center virtual engine following the instructions in Engine Deployment and this chapter. Note: Be aware that a reinstall procedure reformats the hard drive, reinstalls all the Extreme Management Center engine software, the operating system, and all related Linux packages.
Pre-Configuration Tasks ExtremeControl Engine Configuration Once the ExtremeControl virtual engine has been deployed on a VMware ESX or ESXi server, or a Hyper-V server using the instructions in Engine Deployment, you are ready to perform the initial engine configuration process described in this chapter. This chapter also includes information on how to change your engine settings following your initial configuration, and how to upgrade or reinstall the engine software.
Configuring the ExtremeControl Engine The following screen appears. ========================================================== ====== Extreme Networks - Network ExtremeControl Engine Welcome to the ExtremeControl Engine Setup ========================================================== ====== Please enter the information as it is requested to continue with the configuration. Typically a default value is displayed in brackets.
Configuring the ExtremeControl Engine 4. In the ExtremeControl engine Configuration screen, enter the requested configuration information for each line and press [Enter]. ========================================================== ====== ExtremeControl Configuration ========================================================== ====== Enter the hostname for the appliance [nacappliance]: Enter the IP address for (Required): Enter the IP netmask [255.255.255.0]: Enter the gateway address [192.168.2.
Configuring the ExtremeControl Engine Configure Date And Time Settings ========================================================== ====== The appliance date and time can be set manually or using an external Network Time Protocol (NTP) server. It is strongly recommended that NTP is used to configure the date and time to ensure accuracy of time values for SNMP communications and logged events. Up to 5 server IP addresses may be entered if NTP is used.
Configuring the ExtremeControl Engine ========================================================== ====== Set Date And Time ========================================================== ====== The current system date and time is: Thu Apr 24 09:34:08 2018 Please enter the values for date and time as directed where input is expected in the following format: MM - 2 digit month of year DD - 2 digit day of month YYYY - 4 digit year hh - 2 digit hour of day using a 24 hour clock mm - 2 digit minute of hour ss - 2 di
Configuring the ExtremeControl Engine Set Time Zone ========================================================== ====== You will now be asked to enter the time zone information for this system. Available time zones are stored in files in the /usr/share/zoneinfo directory. Please select from one of the following example time zones: 1. US Eastern 2. US Central 3. US Mountain 4. US Pacific 5.
Configuring the ExtremeControl Engine Configuration of the appliance network settings is now complete. Enter 0 or any key other than a valid selection to continue. If you need to make a change, enter the appropriate number from the choices listed below. ============================================================== == 0. Accept the current settings 1. Edit NAC Appliance settings 2. Edit SNMP settings 3. Edit date and time 4.
Changing ExtremeControl Engine Settings Note: When you add the virtual engine to Extreme Management Center, you will be asked to supply a virtual ExtremeControl engine license number. (When you purchased your engine, you received a Licensed Product Entitlement ID. This Entitlement ID allows you to generate a product license. Refer to the instructions included with the Entitlement ID that was sent to you.
Changing ExtremeControl Engine Settings 1. From the NAC Manager menu bar, select Tools > Management and Configuration > Advanced Configurations. The Advanced Configuration window opens. 2. In the left-panel tree, expand the Global and Appliance Settings folder and then expand the Appliance Settings folder. 3. Click on the desired engine settings (typically Default unless you have configured a custom engine setting). 4. In the right panel, select the Network tab to change your engine configurations.
Changing ExtremeControl Engine Settings Changing the Extreme Management Center Server IP Address To change the IP address of the Extreme Management Center server, enter the following command at the login prompt in the Console tab: /opt/nac/configMgmtIP Enter the following command to start using the new Extreme Management Center server: nacctl restart Changing Web Service Credentials The Web Service credentials provide access to the NAC Appliance Administration web page and the web services i
Upgrading ExtremeControl Engine Software Changing Date and Time Settings To enable or disable NTP for engine date and time, or to manually set the date and time on the engine, enter the following command at the login prompt in the Console tab: /usr/postinstall/dateconfig This will start the date and time configuration script and allow you to change the settings.
Reinstalling ExtremeControl Engine Software Note: Be aware that a reinstall procedure reformats the hard drive, reinstalls all the ExtremeControl engine software, the operating system, and all related Linux packages.
Pre-Configuration Tasks ExtremeAnalytics Engine Configuration Once the ExtremeAnalytics virtual engine has been deployed on a VMware ESX or ESXi server, or a Hyper-V server using the instructions in Engine Deployment, you are ready to perform the initial engine configuration process described in this chapter. This chapter also includes information on how to change your engine settings following your initial configuration, and how to upgrade or reinstall the engine software.
Configuring the ExtremeAnalytics Engine 1. In the Console tab of the vSphere client, login as root with no password, and then press [Enter]. The following screen appears. ========================================================== Extreme Networks, Inc. - ProductSeries Appliance Welcome to the ExtremeAnalytics Appliance Setup ========================================================== Please enter the information as it is requested to continue with the configuration.
Configuring the ExtremeAnalytics Engine 3. Press [Enter] to set a new root password. The following text appears where you can enter the new password: Enter new UNIX password: Retype new UNIX password: 4. From the ExtremeAnalytics Appliance (Engine) Deployment Modes screen, select the deployment mode that matches your network environment. The default deployment mode is 2.
Configuring the ExtremeAnalytics Engine 3. Interface Tunnel Mirrored Separate interfaces are configured for management and monitoring traffic. The monitoring interface will get its own IP Address and GRE Tunnels will be configured for traffic monitoring. Suitable for feeds from Coreflow switches. 4. Manual Mode The interface and tunneling configurations will not be modified by this script, leaving them to be manually edited by the user instead.
Configuring the ExtremeAnalytics Engine Enable NIS (y/n) [n]? 6. Continue as follows: For deployment mode 1, go to step 10. For deployment mode 2, go to step 7. For deployment mode 3, go to step 9. 7. If you are using a VMware server, proceed to Step 8. If you are using a Hyper-V server, you need to change the configuration on the Windows Server system to promiscuous mode by running the set_promiscuous.ps1 script, included in the ZIP file containing the virtual engine.
Configuring the ExtremeAnalytics Engine 9. Specify one or more GRE tunnel interfaces. For each line, enter the requested configuration information and press [Enter]. ========================================================== ExtremeAnalytics Appliance Network Configuration for Tunnel Interfaces ========================================================== Enter the interface name for Tunnel Configuration [eth1]: eth4 Enter information below to configure eth4 Enter the IP address for eth4 on pv88 [10.54.211.
Configuring the ExtremeAnalytics Engine Enter the SRC IP address for the GRE Tunnel [10.54.222.117]: Enter the DST IP address for the GRE Tunnel [192.168.1.1]: 10.54.2.117 Add another GRE Tunnel (y/n) [n]? n 11. A screen appears asking you to confirm your network setting. Enter 0 to accept the settings. The following example shows the Confirm Network Settings screen for deployment mode 2.
Configuring the ExtremeAnalytics Engine The following example shows the Confirm Network Settings screen for deployment mode 3. ========================================================== Confirm Network Settings ========================================================== These are the settings you have entered. Enter 0 or any key other than a valid selection to continue. If you need to make a change, enter the appropriate number now or run the /usr/postinstall/dnetconfig script at a later time.
Configuring the ExtremeAnalytics Engine SNMP Configuration ========================================================== The following information will be used to configure SNMP management of this device. The SNMP information entered here must be used to contact this device with remote management applications such as Extreme Management Center Console.
Configuring the ExtremeAnalytics Engine VMs that are hosted on the VMS server). ========================================================== Configure Date And Time Settings ========================================================== The appliance date and time can be set manually or using an external Network Time Protocol (NTP) server. It is strongly recommended that NTP is used to configure the date and time to ensure accuracy of time values for SNMP communications and logged events.
Configuring the ExtremeAnalytics Engine ========================================================== Set Date And Time ========================================================== The current system date and time is: Thu 14 Nov 2018 04:34:08 PM EST Please enter the values for date and time as directed where input is expected in the following format: MM - 2 digit month of year DD - 2 digit day of month YYYY - 4 digit year hh - 2 digit hour of day using a 24 hour clock mm - 2 digit minute of hour ss - 2 digit sec
Configuring the ExtremeAnalytics Engine Set Time Zone ========================================================== You will now be asked to enter the time zone information for this system. Available time zones are stored in files in the /usr/share/zoneinfo directory. Please select from one of the following example time zones: 1. US Eastern 2. US Central 3. US Mountain 4. US Pacific 5. Other - Shows a graphical list ========================================================== Enter selection [1]: 19.
Launching the ExtremeAnalytics Application The ExtremeAnalytics application software is automatically installed. This could take a few minutes. When the installation is complete, you’ll see the following screen. ========================================================== Extreme Networks - ExtremeAnalytics Appliance - Setup Complete ========================================================== Setup of the ExtremeAnalytics Appliance is now complete.
Adding the ExtremeAnalytics Engine 3. At the login window, enter your Extreme Management Center user name and password. 4. On the Management Center screen, click Analytics at the top of the screen. 5. Click Dashboard. The Dashboard view displays. For more information on the Extreme Management Center Launch page, access the Online Help by clicking Help in the left corner of the Launch Page banner.
Adding the ExtremeAnalytics Engine 1. Select the Analytics Configuration tab. 2. Open the drop-down list below Overview and select Add Engine. The Add Purview Appliance window displays.
Changing ExtremeAnalytics Engine Settings 3. Enter the following information: l IP address of the eth0 interface l Name of the ExtremeAnalytics engine 4. From the Profile list, select the appropriate SNMP profile. 5. Click OK. 6. Open the drop-down list below Overview and select Enforce Engine. Changing ExtremeAnalytics Engine Settings Use these steps if you need to change your ExtremeAnalytics virtual engine settings following your initial engine configuration.
Upgrading ExtremeAnalytics Engine Software the login prompt in the Console tab: /usr/postinstall/dateconfig This will start the date and time configuration script and allow you to change the settings. Changing the ExtremeAnalytics Server IP Address To change the IP address of the ExtremeAnalytics server, enter the following command at the login prompt in the Console tab: /opt/appid/configMgmtIP Then, start using the new ExtremeAnalytics server by typing: appidctl restart.
Reinstalling ExtremeAnalytics Engine Software Prior to performing an upgrade, you can create a snapshot of the engine that you can revert to in the event an upgrade fails. Refer to the vSphere client documentation for instructions on creating a snapshot. 1. On a system with an Internet connection, go to the Network Management Suite (NMS) Download web page: http://extranet.extremenetworks.com/downloads/pages/NMS.aspx. 2.