
Installation Guide

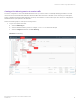
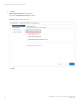
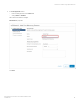
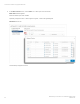
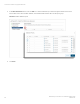

Table Of Contents

j) Click Next.
The Ready to complete page appears.
k) On the Ready to complete page, review the conguration settings for the virtual machine.
l) Click Finish.
The virtual machine appears in the inventory.
m) After the VM has powered on, log on to the Virtual Sensor VM with the following credentials:
• localhost login: root
• Password: password
If you have provided the XMC IP address, Virtual Sensor tries to connect to XMC using ZTP+. Otherwise, Virtual Sensor tries to
resolve the extremecontrol host name to IP using DNS.
This completes Virtual Sensor installation on a single ESXi host. Repeat the steps above for installing Virtual Sensor on additional ESXi
hosts.
Complete the remaining steps in XMC to discover and add the device to the inventory. For more information, see the section Post-
installation conguration on page 29.
NOTE
If Virtual Sensor receives trac as it is initializing, packet drops (reported as mbuf allocation failure) may be
observed.
Recommended vCenter settings for Virtual Sensor
The following vCenter settings are recommended for optimal performance of your Virtual Sensor VM:
1. Power
o the Virtual Sensor VM.
2. Right-click the VM and select Edit Settings.
3. On the Virtual Hardware tab, expand CPU, and allocate the CPU capacity as follows:
TABLE 8
Option Description
Reservation Reservation = number of vCPUs * CPU speed of ESXi
Example
• Medium OVA: 2 * 2297 = 4594 MHz
• Small OVA: 1 * 2297 = 2297 MHz
Shares Set this to High.
4. Click OK.
5. Right-click the Virtual Sensor VM again and select Compatibility > Upgrade VM Compatibility.
The virtual hardware is upgraded to the latest supported version.
NOTE
The Upgrade VM Compatibility option only appears if the virtual hardware on the VM is not the latest supported
version.
6. Click Yes to continue with the upgrade.
7. Power on the virtual machine.
Virtual Sensor installation using vSphere Web Client
ExtremeAnalytics Virtual Sensor 1.0.0 Software Installation Guide
22 9036611-00