
Installation Guide

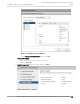
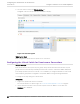

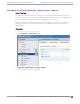

Table Of Contents
- Table of Contents
- Preface
- Overview
- Virtual Appliance Deployment
- Virtual Appliance Configuration
- Access the Virtual Appliance Console
- Configure the VE6120/VE6125 using the Basic Configuration Wizard
- Set up the VE6120/VE6125 Appliance using the Basic Configuration Wizard
- Upgrade the VE6120/VE6125 Software
- Set Up the Virtual Appliance to Accept USB Flash Drives
- Generate and Install the Activation Package
- Subscription License
- Permanent Capacity License
- Configure vSwitches for the Virtual Appliance
- Configure a Virtual Machine to Gain Networking Performance
- Shut Down and Restart a Virtual Machine
- Index

Configure vSwitches for the Virtual
Appliance
Create a New Virtual Switch or Port Group on the ESXi Server on page 41
Configuring the Virtual Switch for Promiscuous Connections on page 44
Configure the Virtual Switch for Jumbo Frames Support on page 47
The Virtual Appliance has some
specific requirements on the virtual switches (vSwitch) to which its
data plane ports are connected. The following section explains how to create a vSwitch on an ESXi host
that satisfies these requirements.
This does not replace the vSphere ESXi documentation. Before performing this procedure, you must log
into the vSphere client using credentials that grant full administrative access to the vSphere ESXi host
server.
Create a New Virtual Switch or Port Group on the ESXi Server
About This Task
This is an optional procedure since it is possible to reconfigure the virtual switch created by default
when ESXi is installed to support VLANs or when another custom vSwitch is configured on the host.
However, using separate vSwitches for the data plane trac helps to isolate that trac from other
virtual devices and permits the switch to be configured specifically to meet the needs of the VE6120
appliance.
Note
Alternatively, it is also possible to define more than one network (port group) on a single
vSwitch. All networks on the same vSwitch share the NICs assigned to the vSwitch.
To create a new switch or a port group:
Procedure
1. Login to the vSphere web client.
For more information, see Access the Virtual Appliance Console on page 21.
2. On the vSphere web client screen, select the vSphere server’s IP address or host name in the left
pane. The Configure tab displays on the right pane.
3. Select Networking > Virtual switches.
VE6120/VE6125 Virtual Appliances Installation Guide VMware® Platform for version 5.16.01
41