Extreme API with Python
Manuals
Brands
Extreme Networks Manuals
Computers & Accessories
Wired and wireless orchestration for campus and IoT networks
121
122
123
124
125
126
127
128
129
130
Table Of Contents
1 Preface
1.1 References
1.2 Acknowledgements
2 Introduction
2.1 Using Python
2.1.1 Install Python
2.1.2 Update Your PATH
2.1.3 Virtual Environment
2.1.4 PIP
2.1.5 Editors and IDE
2.2 REST APIs
2.2.1 URLs
2.2.2 HTTP Status Codes
2.2.3 HTTP Request Methods
2.2.4 HTTP Headers
2.2.4.1 Content-Type
2.2.4.2 Accept
2.2.4.3 Authorization
2.2.4.4 X-Auth-Token
2.2.5 Manipulating Headers with Python
2.3 Authentication and Authorization
2.3.1 Basic Authentication
2.3.2 Bearer Authentication
2.3.3 API Key
2.3.4 OAuth 2.0
2.3.5 Managing Passwords or Tokens with Python
2.4 Understanding JSON
2.5 Manipulating JSON with Python
2.6 Interact with a REST API using Python
2.6.1 Urllib
2.6.1.1 Urllib examples
2.6.2 Requests
2.6.3 Testing a REST API
2.7 Webhooks
2.8 HTTPS with Python
3 EXOS APIs
3.1 On-Switch APIs
3.1.1 Python Scripting
3.1.1.1 Create a Python Script
3.1.1.2 Copying Python Scripts to a Switch
3.1.1.3 Execute a Python Script
3.1.1.4 EXOS CLI Module
3.1.1.5 Automate the Python Script Execution
3.1.1.5.1 UPM
3.1.1.5.2 Startup Files
3.1.2 Python Application
3.1.2.1 Create a Process
3.1.2.2 Create an Application
3.1.2.3 Add Proper Environment Validation
3.2 External APIs
3.2.1 RESTCONF API
3.2.1.1 RESTCONF Documentation
3.2.1.2 Working with EXOS RESTCONF
3.2.1.3 How to Access Restconf
Enable HTTPS on EXOS
3.2.1.4 Using Restconf with Python
3.2.2 JSON-RPC API
3.2.2.1 JSON-RPC Overview
3.2.2.2 EXOS JSON-RPC
3.2.2.3 Using JSON-RPC with Python
4 VOSS API
4.1 VOSS RESTCONF Documentation
4.2 Enable RESTCONF
4.3 Use RESTCONF with Python
4.4 EXOS & VOSS Restconf Python Classes
5 XMC API
5.1 Python Scripting Engine
5.1.1 Default Location for Scripts
5.1.2 Add a User-Created Script
5.1.3 Python Modules Shipped with XMC
5.1.4 System Path and Precedence
5.1.5 Install a Library
5.1.6 XMC Python Module
5.1.6.1 emc_vars
5.1.6.2 emc_cli.send()
5.1.6.3 Additional emc_cli Methods
5.1.6.4 Add User-Input Variables to a Script
5.2 Workflow Engine
5.2.1 emc_vars
5.2.2 Create Workflows
5.2.3 Create Variables
5.2.4 emc_results
5.2.5 Add User Inputs
5.2.6 Automate Workflow Execution
5.2.7 Workflow Example
5.3 NorthBound Interface API
5.3.1 emc_nbi
5.3.2 GraphQL Query
5.3.3 GraphQL Mutation
5.3.4 RBAC for API Usage
5.3.5 External Access to the NBI API
5.3.6 Use NBI to Execute a Workflow
5.4 Axis API
5.4.1 Analytics Methods
5.4.1.1 addLocation
5.4.1.2 addLocationGroup
5.4.1.3 getAppliances
5.4.1.4 getApplicationBrowserTableData
5.4.1.5 getBidirectionalFlowsData
5.4.1.6 getLocations
5.4.1.7 getUnidirectionalFlowsData
5.4.1.8 getVersion
5.4.1.9 importLocationCSV
5.4.2 Analytics API with Python
6 ExtremeCloud IQ API
6.1 Connect to the xAPI
6.1.1 Create Tokens
6.1.2 Headers for the xAPI
6.1.3 xAPI Endpoints
6.1.4 Parameters
6.2 Use Python with XIQ
6.2.1 Use GET
6.2.2 Use POST
6.2.3 Use Webhooks
7 Extreme Campus Controller API
7.1 Set Up Authorization
7.2 Use GET method
7.3 Use POST
7.4 Use PUT
7.5 Use DELETE
Extreme API wit
h Python
Page
|
130
Part no.
9036931
-
00
Rev AA
February 2021
E
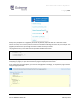
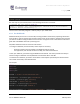
nable Presence Analytics in
your
n
etw
ork
p
olicy in t
he Additional Settings pa
nel.
T
he default trap interval i
s set to
60 sec
onds.
L
ook at
your
web
hook test
er
to
see if
you
are receivin
g data every minute.
1
...
...
128
129
130
131
132
...
...
144