
Deployment Guide
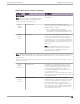
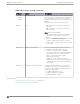

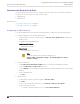
Table Of Contents
- Table of Contents
- Preface
- About Extreme Campus Controller Deployment
- Configuring DHCP, NPS, and DNS Services
- Centralized Site with a Captive Portal
- Centralized Site with AAA Network
- Deploying a Mesh Network
- Configuring an External NAC Server for MBA and AAA Authentication
- Manage RADIUS Servers for User Authentication
- External Captive Portal on a Third-Party Server
- Access Control Rule Admin Portal Access
- Deploying Centralized Web Authentication
- Deploying ExtremeCloud IQ - SE as an External Captive Portal
- Deployment Strategy
- Configuring an External Captive Portal Network
- Editing the Configuration Profile for Network and Roles
- Extreme Campus Controller Default Pass-Through Rule
- Adding Extreme Campus Controller as a Switch to ExtremeCloud IQ - Site Engine
- Editing the Unregistered Policy on ExtremeCloud IQ - Site Engine
- Editing the ExtremeCloud IQ - Site Engine Profile for Policy and Location-Based Services
- Deploying an ExtremeGuest Captive Portal
- Deploying Client Bridge
- Deploying an Availability Pair
- Deploying Universal APs
- Extreme Campus Controller Pair with ExtremeLocation and AirDefense
- ECP Local Authentication
- PHP External Captive Portal, Controller’s Firewall Friendly API
- Index

Edit Mesh Device Settings
Configure Profile Edit Mesh Device Settings. The Edit Mesh Device Settings depend on the device
group AP model: Wi-Fi 6 access points: AP3xx, AP4xx, and AP5xx, or AP39xx.
Note
Configuration parameters you set from the configuration Profile Mesh Points tab apply to all
APs in a device group. To override settings for a specific AP, see the AP Advanced Overrides.
For more information, see the Extreme Campus Controller User Guide.
1. On the Profile Mesh Points tab, select a mesh network from the AP radio drop-down list.
Note
The access points are limited to one mesh point. Multiple radios can be configured for a
single mesh point.
2. Select Advanced.
The Edit Mesh Device Settings dialog opens.
3. Configure the following settings:
Table 8: Mesh Device Settings
AP Model Option AP Behavior
• AP3xx
• AP4xx
• AP5xx
Root
Note: Wi-Fi 6 access points:
AP3xx, AP4xx, and AP5xx can
be part of the same mesh
network, but they cannot
participate in a mesh network
with AP39xx. AP39xx access
points must be a separate mesh
network from the Wi-Fi 6 APs.
A root mesh point is defined as a mesh point that
is connected to the WAN and provides a wired
backhaul to the network. Select the root behavior
of this mesh point.
• Yes — Mesh point is root node for this mesh
network.
• No — Mesh point is not a root node for this
mesh network. (Additional settings display.)
• AP3xx
• AP4xx
• AP5xx
Monitor Primary Port Link (Available for root APs) With Monitor Primary Port
Link enabled, if a root AP loses connection to the
backhaul, the non-root APs scan for a new root AP
and the original root performs service as a non-
root AP. When the original root AP restores
connectivity, it resumes the role of root AP.
Through the use of Automatic Channel Selection
(ACS), the optimum path is restored.
• AP3xx
• AP4xx
• AP5xx
Preferred Neighbor (Available for non-root APs) Select the preferred
Neighbor (AP name and radio) from a list of APs
with a root or non-root mesh radio.
When a non-root AP can see mesh beacons from
more than one neighbor, this setting configures
the AP to prefer one beacon over all others when
choosing a path back to the root.
• AP3xx
• AP4xx
• AP5xx
Preferred Root (Available for non-root APs) Select the preferred
root AP from a list of APs with a root mesh radio.
Use this setting to balance the number of mesh
points reporting to a specific root AP.
Edit Mesh Device Settings Deploying a Mesh Network
74 Extreme Campus Controller Deployment Guide for version 5.46.03