
Deployment Guide
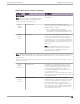
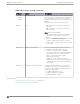

Table Of Contents
- Table of Contents
- Preface
- About Extreme Campus Controller Deployment
- Configuring DHCP, NPS, and DNS Services
- Centralized Site with a Captive Portal
- Centralized Site with AAA Network
- Deploying a Mesh Network
- Configuring an External NAC Server for MBA and AAA Authentication
- Manage RADIUS Servers for User Authentication
- External Captive Portal on a Third-Party Server
- Access Control Rule Admin Portal Access
- Deploying Centralized Web Authentication
- Deploying ExtremeCloud IQ - SE as an External Captive Portal
- Deployment Strategy
- Configuring an External Captive Portal Network
- Editing the Configuration Profile for Network and Roles
- Extreme Campus Controller Default Pass-Through Rule
- Adding Extreme Campus Controller as a Switch to ExtremeCloud IQ - Site Engine
- Editing the Unregistered Policy on ExtremeCloud IQ - Site Engine
- Editing the ExtremeCloud IQ - Site Engine Profile for Policy and Location-Based Services
- Deploying an ExtremeGuest Captive Portal
- Deploying Client Bridge
- Deploying an Availability Pair
- Deploying Universal APs
- Extreme Campus Controller Pair with ExtremeLocation and AirDefense
- ECP Local Authentication
- PHP External Captive Portal, Controller’s Firewall Friendly API
- Index

5. Repeat steps 2-4 to create a second device group for The Root access point.
The next step is to configure Advanced configuration Profile settings and Root behavior for the APs in
the device group.
Related Topics
Advanced Configuration Profile and Mesh Device Settings on page 73
Advanced Configuration Profile and Mesh Device Settings
After you have configured a device group for the non-root APs and a device group for the root AP,
configure the Profile settings:
• Verify configuration Profile Advanced settings.
• Configure Profile Edit Mesh Device Settings.
Profile Advanced Settings
Verify configuration Profile Advanced settings:
1. Go to Configure > Sites and select a site.
2. Select Device Groups.
3. Next to the Profile field, select .
4. Select Advanced.
• A single mesh point is supported on multiple radios for a single AP. You can use dierent
channels for each hop of a multiple hop mesh network. This can improve air time utilization and
possibly increase throughput. However, multiple hops do not improve latency, so a best practice
is to keep the number of hops less than two.
• The AP4000 6 GHz radio is supported in a mesh network.
• Radio settings for the root-AP and non-root APs must match.
• When you add or remove a mesh point from a radio, the AP will reboot.
• Dual-band support is available with Mesh Point. When one radio is configured for Mesh Point,
both radios can provide service.
• The recommended Poll Timeout setting for non-root APs is 60 seconds.
Deploying a Mesh Network
Advanced Configuration Profile and Mesh Device
Settings
Extreme Campus Controller Deployment Guide for version 5.46.03 73