
Deployment Guide
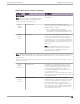
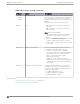

Table Of Contents
- Table of Contents
- Preface
- About Extreme Campus Controller Deployment
- Configuring DHCP, NPS, and DNS Services
- Centralized Site with a Captive Portal
- Centralized Site with AAA Network
- Deploying a Mesh Network
- Configuring an External NAC Server for MBA and AAA Authentication
- Manage RADIUS Servers for User Authentication
- External Captive Portal on a Third-Party Server
- Access Control Rule Admin Portal Access
- Deploying Centralized Web Authentication
- Deploying ExtremeCloud IQ - SE as an External Captive Portal
- Deployment Strategy
- Configuring an External Captive Portal Network
- Editing the Configuration Profile for Network and Roles
- Extreme Campus Controller Default Pass-Through Rule
- Adding Extreme Campus Controller as a Switch to ExtremeCloud IQ - Site Engine
- Editing the Unregistered Policy on ExtremeCloud IQ - Site Engine
- Editing the ExtremeCloud IQ - Site Engine Profile for Policy and Location-Based Services
- Deploying an ExtremeGuest Captive Portal
- Deploying Client Bridge
- Deploying an Availability Pair
- Deploying Universal APs
- Extreme Campus Controller Pair with ExtremeLocation and AirDefense
- ECP Local Authentication
- PHP External Captive Portal, Controller’s Firewall Friendly API
- Index

• Configure one device group: From the configuration Profile, configure the Root behavior as non-
root. Non-root is the correct configuration for all APs in the device group except for the one root AP.
Then, override the Root behavior setting on that one root AP, configuring the designated AP as the
root.
For this deployment example, we will configure two device groups: one for the Root AP and one for the
non-root APs, creating two Profiles: one Profile configured for the root AP and one Profile configured
for the non-root APs.
Note
Mesh Point is supported on ExtremeWireless AP39xx and the Wi-Fi 6 access point models:
AP3xx, AP4xx, and AP5xx. The mesh network must contain only AP39xx access points or
only Wi-Fi 6 access points. You cannot combine the AP39xx platform with the Wi-Fi 6 access
point platforms in a single mesh network.
To configure the device groups for Mesh Point:
1. Configure a site.
Go to Configure > Sites > Add and configure the following site parameters:
Name
Site_Row
Country
Select Toronto Canada.
This value corresponds to the licensing domain ROW.
Timezone
Canada: America/Toronto
2. Create two device groups for the site. One for non-root APs, one for Root APs.
All APs in a device group must share the following:
• AP model number
• Configuration Profile
• RF Management Profile
Go to Configure > Sites and select a site. Then, select Device Groups > Add and configure the
following device group parameters:
Name
• Mesh_AP505_non-root
• Mesh_AP505_root
Profile
AP505-default
Select a configuration Profile that corresponds to the AP model. The configuration profile is
specific to the AP model.
3. Select OK.
4. Select Save on the Site page to save the site and device group.
Configure
Device Groups for Mesh Point Deploying a Mesh Network
72 Extreme Campus Controller Deployment Guide for version 5.46.03