
Deployment Guide
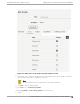

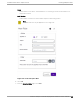

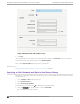
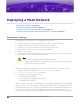
Table Of Contents
- Table of Contents
- Preface
- About Extreme Campus Controller Deployment
- Configuring DHCP, NPS, and DNS Services
- Centralized Site with a Captive Portal
- Centralized Site with AAA Network
- Deploying a Mesh Network
- Configuring an External NAC Server for MBA and AAA Authentication
- Manage RADIUS Servers for User Authentication
- External Captive Portal on a Third-Party Server
- Access Control Rule Admin Portal Access
- Deploying Centralized Web Authentication
- Deploying ExtremeCloud IQ - SE as an External Captive Portal
- Deployment Strategy
- Configuring an External Captive Portal Network
- Editing the Configuration Profile for Network and Roles
- Extreme Campus Controller Default Pass-Through Rule
- Adding Extreme Campus Controller as a Switch to ExtremeCloud IQ - Site Engine
- Editing the Unregistered Policy on ExtremeCloud IQ - Site Engine
- Editing the ExtremeCloud IQ - Site Engine Profile for Policy and Location-Based Services
- Deploying an ExtremeGuest Captive Portal
- Deploying Client Bridge
- Deploying an Availability Pair
- Deploying Universal APs
- Extreme Campus Controller Pair with ExtremeLocation and AirDefense
- ECP Local Authentication
- PHP External Captive Portal, Controller’s Firewall Friendly API
- Index

Deploying a Mesh Network
Deployment Strategy on page 70
Mesh Point Network Settings on page 71
Configure Device Groups for Mesh Point on page 71
Advanced Configuration Profile and Mesh Device Settings on page 73
Deployment Strategy
The following strategy outlines how to configure a Mesh Point network:
1. Configure Mesh Point settings through the Extreme Campus Controller user interface.
2. Connect the Root AP to the backbone network using the AP GE1 port.
3. Connect the non-root APs to the backbone network using the AP GE1 port.
4. Wait for the non-root APs to receive the controller configuration.
5. Deploy the non-root APs.
6. If the wired network is bridged through the wireless mesh network, then connect the wired switch
(or other device) to the non-root AP using the GE2 port.
Note
• Ports on the Universal APs are labeled with the prefix ETH.
• When a single interface AP is configured as a Mesh non-root AP, the single interface is
used as a client port, not as an uplink.
Take the following steps to configure Mesh Point on the Extreme Campus Controller user interface:
1. Configure a Mesh Point Network. See Mesh Point Network Settings on page 71.
2. Configure Device Groups for Mesh Point on page 71.
3. From the device group configuration Profile:
• Specify the Mesh Point Network.
• Specify Advanced configuration Profile settings.
• Specify Mesh Device Settings.
Initially, configure non-root APs over wired Ethernet, connected to the Management Port. After adding
an AP to a non-root mesh device group, the AP will reboot and then it will be a member of the group
without the Ethernet network. (It is highly recommended to disconnect the Management Ethernet port
at this time.) If you need to modify the configuration of a non-root AP after deploying in a mesh
network, reconnect the AP through the Management Ethernet port and verify mesh point configuration.
70
Extreme Campus Controller Deployment Guide for version 5.46.03