
Deployment Guide

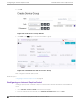
Table Of Contents
- Table of Contents
- Preface
- About Extreme Campus Controller Deployment
- Configuring DHCP, NPS, and DNS Services
- Centralized Site with a Captive Portal
- Centralized Site with AAA Network
- Deploying a Mesh Network
- Configuring an External NAC Server for MBA and AAA Authentication
- Manage RADIUS Servers for User Authentication
- External Captive Portal on a Third-Party Server
- Access Control Rule Admin Portal Access
- Deploying Centralized Web Authentication
- Deploying ExtremeCloud IQ - SE as an External Captive Portal
- Deployment Strategy
- Configuring an External Captive Portal Network
- Editing the Configuration Profile for Network and Roles
- Extreme Campus Controller Default Pass-Through Rule
- Adding Extreme Campus Controller as a Switch to ExtremeCloud IQ - Site Engine
- Editing the Unregistered Policy on ExtremeCloud IQ - Site Engine
- Editing the ExtremeCloud IQ - Site Engine Profile for Policy and Location-Based Services
- Deploying an ExtremeGuest Captive Portal
- Deploying Client Bridge
- Deploying an Availability Pair
- Deploying Universal APs
- Extreme Campus Controller Pair with ExtremeLocation and AirDefense
- ECP Local Authentication
- PHP External Captive Portal, Controller’s Firewall Friendly API
- Index

filters. Examples of supported topology modes are Bridged at AP and Bridged at AC. Select a
VLAN from the list.
2. Select Save.
When a client connects to the network, a captive portal page is presented. The user enters a user name
and password. The RADIUS authenticates the user name and password. Captive portal automatically
generates two engine rules that define the Accept Policy for a client before authentication and after
authentication.
Next, work with the Extreme Campus Controller engine rules.
Related Topics
Working with Internal Captive Portal Engine Rules on page 59
Working with Internal Captive Portal Engine Rules
When configuring captive portal, the Extreme Campus Controller Rules Engine creates default rules for
network policy. Use the default rules and modify the Accept Policy when necessary.
1. Go to Onboard > Rules.
Two new engine rules are displayed:
• Unregistered LOC: Network: Test1- ICP (SSID of network)
Prior to CP authentication, the client matches this rule and applies the Accept Policy of a non-
authenticated role.
• Web Authenticated LOC: Network: Test1- ICP (SSID of network)
Once the client password is authenticated on the RADIUS server, the client matches this rule and
applies the Accept Policy of the Enterprise User role.
The Enterprise User is the default Accept Policy.
Alternatively, you can create unique Accept Policy roles to be assigned upon authentication.
a. Select the rule Web Authenticated LOC: Network: Test1- ICP and click
to edit.
b. From the Accept Policy field select a dierent value.
2. Click Save.
Next, modify the device group profile to enable the network and role options we are using.
Related Topics
Editing Device Group Profile for Network and Role on page 59
Editing Device Group Profile for Network and Role
Configure a network and be aware of policy roles that you are using before modifying the device group
profile.
1. Go to Configure > Sites and select a site.
2. Click Device Groups.
3. Select DeviceGroup_AP3915.
Centralized Site with a Captive Portal
Working with Internal Captive Portal Engine Rules
Extreme Campus Controller Deployment Guide for version 5.46.03 59