
Deployment Guide

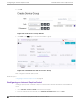
Table Of Contents
- Table of Contents
- Preface
- About Extreme Campus Controller Deployment
- Configuring DHCP, NPS, and DNS Services
- Centralized Site with a Captive Portal
- Centralized Site with AAA Network
- Deploying a Mesh Network
- Configuring an External NAC Server for MBA and AAA Authentication
- Manage RADIUS Servers for User Authentication
- External Captive Portal on a Third-Party Server
- Access Control Rule Admin Portal Access
- Deploying Centralized Web Authentication
- Deploying ExtremeCloud IQ - SE as an External Captive Portal
- Deployment Strategy
- Configuring an External Captive Portal Network
- Editing the Configuration Profile for Network and Roles
- Extreme Campus Controller Default Pass-Through Rule
- Adding Extreme Campus Controller as a Switch to ExtremeCloud IQ - Site Engine
- Editing the Unregistered Policy on ExtremeCloud IQ - Site Engine
- Editing the ExtremeCloud IQ - Site Engine Profile for Policy and Location-Based Services
- Deploying an ExtremeGuest Captive Portal
- Deploying Client Bridge
- Deploying an Availability Pair
- Deploying Universal APs
- Extreme Campus Controller Pair with ExtremeLocation and AirDefense
- ECP Local Authentication
- PHP External Captive Portal, Controller’s Firewall Friendly API
- Index

Configuring a Captive Portal Network
Configuring an Internal Captive Portal network with WPAv2 PSK privacy.
Note
Centralized sites support B@AC and B@AP VLAN topology.
1. Go to Configure > Networks > WLANs > Add and configure the following parameters:
Network Name
test1-ICP
SSID
test1-ICP
Status
Enable or disable the network service. Disabling the network service shuts o the service but
does not delete it.
Auth Type
Select WPAv2 - Personal (PSK) then select Edit Privacy and enter a password key.
Enable Captive Portal
Check this option and specify the following parameters:
• Captive Portal Type = Internal
• Default captive portal is specified. This is the captive portal we configured.
• Authentication Method. Select Proxy RADIUS (Failover).
Note
Policy assignment through Filter ID is not supported.
• Primary RADIUS. This is the RADIUS server we configured. Enter the IP address. You have the
option to add 1-3 failover RADIUS servers.
• Default VLAN = test1. This is the B@AC VLAN we created.
Default Auth Role
The default network policy roles for an authenticated client. Select the plus sign to create a new
role.
Select the policy role as the default authentication policy role. Typically, Enterprise User is the
Default Auth Role. You can select any of the configured roles.
To configure a new role:
a. Go to Configure > Policy > Roles.
b. Go to Onboard > Rules and edit a policy rule, specifying Default Auth Role in the Accept
Policy field.
Default VLAN
The default network topology. A topology can be thought of as a VLAN (Virtual LAN) with at
least one egress port, and optionally include: sets of services, exception filters, and multicast
Configuring
a Captive Portal Network Centralized Site with a Captive Portal
58 Extreme Campus Controller Deployment Guide for version 5.46.03