
Deployment Guide

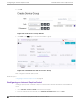
Table Of Contents
- Table of Contents
- Preface
- About Extreme Campus Controller Deployment
- Configuring DHCP, NPS, and DNS Services
- Centralized Site with a Captive Portal
- Centralized Site with AAA Network
- Deploying a Mesh Network
- Configuring an External NAC Server for MBA and AAA Authentication
- Manage RADIUS Servers for User Authentication
- External Captive Portal on a Third-Party Server
- Access Control Rule Admin Portal Access
- Deploying Centralized Web Authentication
- Deploying ExtremeCloud IQ - SE as an External Captive Portal
- Deployment Strategy
- Configuring an External Captive Portal Network
- Editing the Configuration Profile for Network and Roles
- Extreme Campus Controller Default Pass-Through Rule
- Adding Extreme Campus Controller as a Switch to ExtremeCloud IQ - Site Engine
- Editing the Unregistered Policy on ExtremeCloud IQ - Site Engine
- Editing the ExtremeCloud IQ - Site Engine Profile for Policy and Location-Based Services
- Deploying an ExtremeGuest Captive Portal
- Deploying Client Bridge
- Deploying an Availability Pair
- Deploying Universal APs
- Extreme Campus Controller Pair with ExtremeLocation and AirDefense
- ECP Local Authentication
- PHP External Captive Portal, Controller’s Firewall Friendly API
- Index

4. Confirm that DNS service is running.
ps -ef | grep named
named 10023 1 0 Feb18 ? 00:00:00 /usr/sbin/named -u named -t /var/named/chroot
root 7687 7531 0 22:14 pts/982 00:00:00 grep named
5. Verify that the domain name is configured properly.
nslookup Controller.Availability-221.com
Server: 127.0.0.1
Address: 127.0.0.1#53
Name: Controller.Availability-221.com
Address: 10.2.221.2
Configure Extreme Campus Controller for Local DHCP Management
For Bridged@AC configurations, the appliance can be configured as a Local DHCP (Dynamic Host
Configuration Protocol) server for the VLAN segment. This is useful for deployments that do not have
access to a an infrastructure provided DHCP server. Configure Extreme Campus Controller as a Local
DHCP from the Layer 3 settings of a Bridged@AC topology.
When the appliances are configured as a High Availability pair, the configuration sync to the peer
appliance results in two DHCP servers being configured for one appliance pair. Extreme Campus
Controller automatically syncs the configuration for redundancy. Therefore, if one appliance (and its
corresponding DHCP server instance) is removed, the remaining appliance (and DHCP server) have full
visibility of the allocated DHCP set, and support the subnet without interruption or conflict.
When configuring Extreme Campus Controller for providing IP addresses to APs, take the following
steps on both appliances in a High Availability Pair:
1. Define a physical topology on each Extreme Campus Controller.
Configure a shared subnet and a unique IP address for each controller.
2. From Extreme Campus Controller, enable Local DHCP server on the physical topology for both
controllers.
3. Specify the same L2 subnet on both physical topologies. The following settings should match on
both controllers:
Ensure that the following Physical Interface Settings match on both appliances in the High
Availability Pair:
• Mode
• VLAN ID
• Tagged
• Port
• Device Registration
• Trac Management
Endure that the following Local DHCP settings match on both appliances in the High Availability
Pair:
• Gateway IP address
• IP Address Range
Related Topics
Add a Physical Interface on page 52
Configuring
DHCP, NPS, and DNS Services
Configure Extreme Campus Controller for Local DHCP
Management
Extreme Campus Controller Deployment Guide for version 5.46.03 51