
Deployment Guide

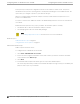

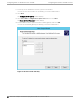
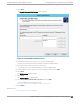

Table Of Contents
- Table of Contents
- Preface
- About Extreme Campus Controller Deployment
- Configuring DHCP, NPS, and DNS Services
- Centralized Site with a Captive Portal
- Centralized Site with AAA Network
- Deploying a Mesh Network
- Configuring an External NAC Server for MBA and AAA Authentication
- Manage RADIUS Servers for User Authentication
- External Captive Portal on a Third-Party Server
- Access Control Rule Admin Portal Access
- Deploying Centralized Web Authentication
- Deploying ExtremeCloud IQ - SE as an External Captive Portal
- Deployment Strategy
- Configuring an External Captive Portal Network
- Editing the Configuration Profile for Network and Roles
- Extreme Campus Controller Default Pass-Through Rule
- Adding Extreme Campus Controller as a Switch to ExtremeCloud IQ - Site Engine
- Editing the Unregistered Policy on ExtremeCloud IQ - Site Engine
- Editing the ExtremeCloud IQ - Site Engine Profile for Policy and Location-Based Services
- Deploying an ExtremeGuest Captive Portal
- Deploying Client Bridge
- Deploying an Availability Pair
- Deploying Universal APs
- Extreme Campus Controller Pair with ExtremeLocation and AirDefense
- ECP Local Authentication
- PHP External Captive Portal, Controller’s Firewall Friendly API
- Index

5. Select Next.
The IP Address Range window is displayed.
Figure 4: IP Address Range
6. In the Start IP address and the End IP address text boxes, type the start and end of the IP address
range that you want to be distributed to the network.
You must use the range provided by your network administrator.
7. In the Length text box, type the numeric value of the subnet mask bits, or in the Subnet mask text
box, type the subnet mask IP address.
A subnet mask defines how many bits of an IP address to use for the network/subnet IDs and how
many bits to use for the host ID. You can specify the subnet mask by length or as an IP address. You
must use the Length (or the Subnet mask) provided by your network administrator.
8. Select Next.
The Add Exclusions window displays.
9. In the Start IP address and the End IP address text boxes, type the start and end of the IP address
range that you want to exclude from the distribution.
You must use the exclusion range provided by your network administrator.
10. Select Next.
The Lease Duration window displays.
The DHCP server assigns a client an IP address for a given amount of time. The amount of time for
which the IP address can be leased is defined in the Lease Duration window.
Configuring
DHCP, NPS, and DNS Services Configuring DHCP on Windows Server 2012 R2
Extreme Campus Controller Deployment Guide for version 5.46.03 25