
Deployment Guide


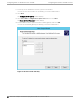
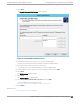

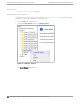
Table Of Contents
- Table of Contents
- Preface
- About Extreme Campus Controller Deployment
- Configuring DHCP, NPS, and DNS Services
- Centralized Site with a Captive Portal
- Centralized Site with AAA Network
- Deploying a Mesh Network
- Configuring an External NAC Server for MBA and AAA Authentication
- Manage RADIUS Servers for User Authentication
- External Captive Portal on a Third-Party Server
- Access Control Rule Admin Portal Access
- Deploying Centralized Web Authentication
- Deploying ExtremeCloud IQ - SE as an External Captive Portal
- Deployment Strategy
- Configuring an External Captive Portal Network
- Editing the Configuration Profile for Network and Roles
- Extreme Campus Controller Default Pass-Through Rule
- Adding Extreme Campus Controller as a Switch to ExtremeCloud IQ - Site Engine
- Editing the Unregistered Policy on ExtremeCloud IQ - Site Engine
- Editing the ExtremeCloud IQ - Site Engine Profile for Policy and Location-Based Services
- Deploying an ExtremeGuest Captive Portal
- Deploying Client Bridge
- Deploying an Availability Pair
- Deploying Universal APs
- Extreme Campus Controller Pair with ExtremeLocation and AirDefense
- ECP Local Authentication
- PHP External Captive Portal, Controller’s Firewall Friendly API
- Index

DHCP options provide specific configuration and service information to DHCP clients. The options
described here are specific to pointing an AP to its adopter and setting the correct MINT link level. The
option value you configure is specific to your network site type.
When you configure DHCP for Extreme Campus Controller, include 078 SLP DA Option for access
points on a Centralized site.
A scope is a collection of IP addresses meant to be distributed by the DHCP server to the client devices
on a subnet.
Enable the DHCP Option for every scope you define. The the DHCP Option is used by:
• The Wireless APs to discover the Extreme Campus Controller
• The mobility agents to discover the mobility manager.
Note
Go to http://support.microsoft.com for instructions on how to install DHCP.
Related Topics
Add a New DHCP Scope on page 24
Configure DHCP Server Options on page 30
Add a New DHCP Scope
Add a scope for the DHCP service.
To configure DHCP on Windows Server 2012 R2:
1. Select Start > Administrative Tool > DHCP.
2. In the console tree, right-click the DHCP server, IPv4 on which you want to create the new DHCP
scope, and then select New Scope.
3. Select Next.
4. In the Name and Description text boxes, type the scope name and description.
This can be any name that you want, but it should be descriptive enough so that you can identify the
purpose of the scope on your network.
Configuring
DHCP on Windows Server 2012 R2 Configuring DHCP, NPS, and DNS Services
24 Extreme Campus Controller Deployment Guide for version 5.46.03