
Deployment Guide


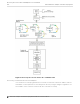
Table Of Contents
- Table of Contents
- Preface
- About Extreme Campus Controller Deployment
- Configuring DHCP, NPS, and DNS Services
- Centralized Site with a Captive Portal
- Centralized Site with AAA Network
- Deploying a Mesh Network
- Configuring an External NAC Server for MBA and AAA Authentication
- Manage RADIUS Servers for User Authentication
- External Captive Portal on a Third-Party Server
- Access Control Rule Admin Portal Access
- Deploying Centralized Web Authentication
- Deploying ExtremeCloud IQ - SE as an External Captive Portal
- Deployment Strategy
- Configuring an External Captive Portal Network
- Editing the Configuration Profile for Network and Roles
- Extreme Campus Controller Default Pass-Through Rule
- Adding Extreme Campus Controller as a Switch to ExtremeCloud IQ - Site Engine
- Editing the Unregistered Policy on ExtremeCloud IQ - Site Engine
- Editing the ExtremeCloud IQ - Site Engine Profile for Policy and Location-Based Services
- Deploying an ExtremeGuest Captive Portal
- Deploying Client Bridge
- Deploying an Availability Pair
- Deploying Universal APs
- Extreme Campus Controller Pair with ExtremeLocation and AirDefense
- ECP Local Authentication
- PHP External Captive Portal, Controller’s Firewall Friendly API
- Index

• On-premises Extreme Management Center or ExtremeCloud IQ - Site Engine
• ExtremeCloud™ IQ
Note
Only one appliance at a time can be configured as the Management Appliance.
When the switch is turned on, it automatically starts the Linux process cloud-connector client.
The cloud-connector client relies on the Default VLAN 1 enabled DHCP client to discover a DHCP server.
The default configuration for these switches includes all data ports configured with VLAN 1. Any pre-
configured data port can be used to connect to a DHCP Server. Simply provide an IP address and the
Domain Name.
After the switch receives an IP address and a Domain Name, it begins the DNS query to find the built-in
Extreme Networks Management Appliance Fully-Qualified Domain Name (FQDN):
• extremecontrol@<domain-name> for on-premises appliances (Extreme Campus Controller or
Extreme Management Center or ExtremeCloud IQ - Site Engine).
The cloud-connector tries to resolve these names in an endless round-robin loop. When any of the
names are resolved to an IP address, the switch attempts connection to that IP address.
Note
Before connecting a switch to an on-premises Management Appliance:
• Within Extreme Campus Controller, configure each physical port to enable device
registration:
1. Go to Administration > System.
2. Under Interfaces select Add.
3. On the Create New Interface dialog, check Enable Device Registration.
• Configure a local DNS server that resolves extremecontrol@<domain-name> to the
IP address of a Extreme Campus Controller physical port that is configured with the
Enable Device Registration enabled.
Related Topics
Discovering Switches on page 20
Switch Discovery in an Availability Pair on page 21
Discovering Switches
A switch discovers Extreme Campus Controller by resolving the built-in Fully-Qualified Domain Name
(FQDN) extremecontrol@<domain-name> to an IP address. <domain-name> is the domain
assigned to the switch by the DHCP server.
To configure switch discovery, add a single “A” record for extremecontrol@<domain-name> to
the local DNS server. If using a public DNS service, add the record to the DNS service. When using the
public option, the DNS servers used by the switch must be integrated with the public service.
When the switch discovers Extreme Campus Controller, the device status is initially In-Service-Trouble.
This corresponds to the cloud-connector machine state Connecting and is represented in Extreme
Campus Controller as a yellow triangle.
Switch Discovery Process
About Extreme Campus Controller Deployment
20 Extreme Campus Controller Deployment Guide for version 5.46.03