
Deployment Guide


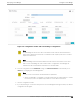
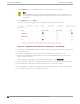
Table Of Contents
- Table of Contents
- Preface
- About Extreme Campus Controller Deployment
- Configuring DHCP, NPS, and DNS Services
- Centralized Site with a Captive Portal
- Centralized Site with AAA Network
- Deploying a Mesh Network
- Configuring an External NAC Server for MBA and AAA Authentication
- Manage RADIUS Servers for User Authentication
- External Captive Portal on a Third-Party Server
- Access Control Rule Admin Portal Access
- Deploying Centralized Web Authentication
- Deploying ExtremeCloud IQ - SE as an External Captive Portal
- Deployment Strategy
- Configuring an External Captive Portal Network
- Editing the Configuration Profile for Network and Roles
- Extreme Campus Controller Default Pass-Through Rule
- Adding Extreme Campus Controller as a Switch to ExtremeCloud IQ - Site Engine
- Editing the Unregistered Policy on ExtremeCloud IQ - Site Engine
- Editing the ExtremeCloud IQ - Site Engine Profile for Policy and Location-Based Services
- Deploying an ExtremeGuest Captive Portal
- Deploying Client Bridge
- Deploying an Availability Pair
- Deploying Universal APs
- Extreme Campus Controller Pair with ExtremeLocation and AirDefense
- ECP Local Authentication
- PHP External Captive Portal, Controller’s Firewall Friendly API
- Index

Go to Networks > Add and configure the following parameters:
Network Name
ECA_EGuest
SSID
ECA_EGuest
Auth Type
Select WPAv2 with PSK then click Edit Privacy and enter a password key.
Enable Captive Portal
Check this option and specify the following parameters:
• Captive Portal Type = EGuest
• Select the ExtremeGuest server from the drop-down list of configured servers. The number of
server fields depends on the number of configured servers. Configure one portal server and up
to two backup servers.
◦ Select an icon (
, , or ) to manage your servers from here. Select the appropriate check
box to indicate that the server handles authentication, accounting, or both. At least one
selection is required for each server.
◦ Select Portal to configure one server as the portal server. If your portal server goes down,
you must manually select a backup server as the portal server.
Note
Walled Garden rules are not required for this network. The process of enabling a captive
portal on the network automatically creates rules allowing DNS, DHCP, and redirection
rules. However, if users are unable to connect to the network, consider creating specific
DNS and DHCP Allow rules as a Walled Garden configuration.
MAC-based authentication (MBA)
This option is enabled by default. Configure the following parameters:
MBA Timeout Role
Unregistered
Use HTTPS connection
Enable this option if connecting to the server through https.
Default Auth Role
Enterprise User
Default VLAN
Bridged at AP Untagged
Configuration Settings on ExtremeGuest
Configure the following settings on ExtremeGuest to support integration with Extreme Campus
Controller:
• Policy Role Names — The policy role names must match on both ExtremeGuest and Extreme
Campus Controller. A simple approach is to create policies on ExtremeGuest with names that match
the Extreme Campus Controller default policies.
Configuration
Settings on ExtremeGuest Deploying an ExtremeGuest Captive Portal
174 Extreme Campus Controller Deployment Guide for version 5.46.03